id-proto-debugger
id-proto-debugger
This is the official home of the community Project.
Formerly oauth2-oidc-debugger. The project was renamed on 2026-08-28: it debugs a
good deal more than OAuth2 and OIDC now — SAML 2.0 and 1.1, WS-Trust, WS-Federation,
SD-JWT VC, WebAuthn, Kerberos v5, SPNEGO, LDAP, SCIM 2.0, SPIFFE, X.509 PKI and
standalone encryption — and the old name described the first two of them. Only the
name changed; nothing about the code, the layout or the commands below did. The
deployed sites keep their own names (idptools.com, test.idptools.com).
This is a simple OAuth2 and OpenID Connect (OIDC) debugger (test tool) that I created as part of a Red Hat SSO blog post I wrote in November, 2017. Since then, I have expanded support to include several major Identity Providers (see the complete list below). The blog post uses this debugger for testing the OpenID Connect setup. So, checkout the blog for usage examples. This project builds a docker container that runs the debugger application.
New to this kind of tool? What a protocol debugger is explains what a protocol debugger does, how it differs from a packet sniffer or a client library, and why identity protocols in particular need one.
Supported Specs & Features
This project currently supports the following specs & features:
- OAuth2 - RFC 6749
- OAuth2 Refresh Token Support
- OAuth2 application authentication with client_id and client_secret via POST body or Basic Auth (rather than client cert or dsig).
- OpenID Connect Core 1
- OpenID Connect Discovery v1.0
- JWT RFC
- JWS JSON Web Signature
- JWE JSON Web Encryption
- PKCE - RFC 7636
- OIDC RP-Initiated Logout v1.0
- OAuth2 Token Introspection Endpoint (RFC7662) – client_credentials (basic auth) or bearer token RFC6750 authentication.
- OAuth2 Device Authorization Grant - RFC8628 – Ever registered an app on your television where it jumped ot your phone? This was probably what was used.
- OAuth2 Token Exchange - RFC8693 – Exchange one token for another: impersonation or delegation, with a
subject_token, an optionalactor_token, andaudience/resource/scope/requested_token_type. It has its own card on the landing page, which opensoauth2_oidc_1.html— you need a subject token before you can exchange one, so the exchange pane itself is on the results page (oauth2_oidc_2.html). Currently only tested with Keycloak v26.x. - OAuth2 Token Revocation - RFC7009
- OIDC Dynamic Client Registration 1.0 – a Relying Party registers itself at the OP’s registration endpoint, sending its client metadata and getting back a
client_id(plus a Registration Access Token andregistration_client_urifor reading the registration back). Read/update/delete of an existing registration follow RFC 7592, and the request/response bodies are RFC 7591’s. It has its own card on the landing page, which opens the Dynamic Client Registration pane onoauth2_oidc_1.html— the same page as the OAuth2 / OIDC workflow, because a registration is what that workflow then uses. - SAML 2.0 – SP-initiated SSO against an IdP over the HTTP-Redirect, HTTP-POST and HTTP-Artifact bindings, with Single Logout, a signed (and optionally encrypted)
AuthnRequest, and the IdP’s response decoded on a page of its own. - SAML 1.1 – the same workflow’s second protocol version, over the same three bindings: Browser/POST and Browser/Artifact, requested with Shibboleth’s
urn:mace:shibboleth:1.0:profiles:AuthnRequestprofile, with the artifact resolved over the SOAP binding at the identity provider’s SAML responder. It is a different protocol, not an older spelling — there is no request message, no Single Logout, nothing to sign and nothing to encrypt — so the settings that do not apply are greyed out and switched off when 1.1 is selected. See docs/saml11.md. - A SAML Assertion Tool that composes a spec-compliant SAML 1.0 / 1.1 / 2.0 assertion and signs and encrypts it in the browser. See the SAML Assertion Tool section below.
- WS-Federation v1.2 Passive Requestor Profile – An older protocol, but still common with Microsoft ADFS.
- SD-JWT — Selective Disclosure for JWTs, RFC 9901 – the format the credential workflows below are built on: salted claim Disclosures hashed into an
_sdarray, a Combined Serialization joined by~, and a Key Binding JWT (section 4.3) whosesd_hashcommits to exactly the bytes presented. In-browser: nothing is disclosed that you did not tick. - SD-JWT VC — SD-JWT-based Verifiable Credentials – the credential type on top of SD-JWT: a
dc+sd-jwttyped JWT with avct, an issuer resolvable byiss(an HTTPS identifier with JWT VC Issuer Metadata, or adid:jwk), and holder binding throughcnf. - OpenID for Verifiable Credential Issuance 1.0 (OID4VCI) – the VC Issuance workflow: credential issuer metadata (including RFC 8414 well-known path insertion), the authorization code and pre-authorized code grants, Credential Offers by value / by
credential_offer_uri/ by QR code with a Transaction Code,authorization_details→credential_identifier, a nonce endpoint andopenid4vci-proof+jwtproof of possession, batch issuance, deferred issuance, encrypted Credential Responses, the Notification Endpoint, and credential refresh (section 14.5). Appendix H use cases H.1, H.2, H.3 and H.6. See the VC Issuance section below. - OpenID for Verifiable Presentations 1.0 (OID4VP) – the VC Presentation workflow: an Authorization Request with
response_type=vp_tokenandresponse_mode=direct_post, a DCQL query decoded into the claim paths being asked for, Client Identifier Prefixes, the request by value or as a signed Request Object by reference, cross-device by QR code, and avp_tokenkeyed by DCQL credential-query id. See the VC Presentation section below. - JAR — JWT-Secured Authorization Request, RFC 9101 – how a Verifier’s OID4VP request is passed by reference and signed, and verified in the browser before anything is disclosed.
- WS-Trust 1.0–1.4 – Issue / Renew / Validate / Cancel against an STS, selectable protocol version (1.0/1.1/1.2 pre-OASIS, 1.3/1.4 OASIS ws-sx), with WS-Security (UsernameToken / SAML token), WS-Addressing, and optional XML Signature / XML Encryption. See the WS-Trust Test Tools section below.
- Kerberos v5 — RFC 4120 – the Kerberos workflow: get a ticket-granting ticket from a real Key Distribution Center (a Windows domain controller, MIT or Heimdal krb5, or this project’s mock KDC), spend it on a service ticket, and present that to a service with mutual authentication — every field of every message shown on the way past, and the encrypted parts opened when you supply the key. Plus a Kerberos Decoder that parses a pasted message, ticket, GSS-API token, keytab or PAC with no network at all. Unlike every other workflow here this one is not available on the hosted site and its card there is greyed out: Kerberos speaks DER over TCP and UDP port 88, and a browser cannot open a socket, so it needs the api service running locally. The decoder needs no network of its own, but it ships with the rest of the workflow rather than alone — run the debugger locally for any of it.
- Kerberos encryption — RFC 3961, RFC 3962, RFC 8009, RFC 4757 – the encryption framework and the types actually in use:
aes128/256-cts-hmac-sha1-96(17, 18), the SHA-2 pair (19, 20) andarcfour-hmac-md5(23), implemented in the browser. DES is decode-only — Windows Server 2025 removed it — so an old capture still renders without pretending the protocol is still safe. - GSS-API Kerberos mechanism — RFC 4121 – the AP exchange as a service actually receives it, including the 0x8003 checksum (which is not a checksum: it carries the channel bindings and the delegation and mutual-authentication flags, with its integers little-endian in a protocol that is otherwise big-endian), and per-message MIC and Wrap tokens.
- The Windows PAC — MS-PAC – what a Windows service actually authorizes on. A Kerberos ticket proves who you are and says nothing about your group memberships; the PAC inside it carries the account’s SID, its groups and its
UserAccountControlflags, signed four different ways with two different keys. “Authentication succeeded but access was denied” is nearly always a question about this structure, and the debugger decodes it and verifies each signature separately. - Kerberos delegation — MS-SFU – S4U2Self (a service obtains a ticket for a user who takes no part in it), S4U2Proxy authorized either by
msDS-AllowedToDelegateToon the front end or bymsDS-AllowedToActOnBehalfOfOtherIdentityon the back end — the resource-based form, which is why “I can write to this computer account” becomes “I can reach this service as anybody” — plus unconstrained delegation with forwarded tickets in aKRB-CRED, and renewals. Every refusal in this area isKDC_ERR_BADOPTIONwhatever the cause, so the page’s job is to narrow it: which attribute on which account, whether the evidence ticket is forwardable, and whether the required padata was sent. - XML Signature
- XML Encryption
- Base64 Encoding
- X.509 Public-Key and Attributes Certificate Framework – and, on the Certificate Authority & X.509 Tools page, the ability to build one: a Root CA, an Intermediate and an Issuing CA, then the leaf certificates any of them can sign — TLS server, TLS client for mutual authentication, code signing, S/MIME, OCSP responder, time stamping, smartcard logon and Kerberos PKINIT — with every RFC 5280 X.509v3 extension editable including its critical flag, and any extension at all addable by OID. Then it opens a real TLS or mutual-TLS connection with what you issued. See the Certificate Authority & X.509 Tools section below.
- [RFC8414]](https://www.rfc-editor.org/rfc/rfc8414.html)
- With the ability to add custom parameters to the Authorization Endpoint call and Token Endpoint call, numerous other protocols can be supported. We’ll eventually get around to adding direct support.
- Token Endpoint calls can be initiated from the front-end or back-end depending on what the IdP requires in various use cases.
- The client_id and client_secret can be submitted to the Token Endpoint via POST body or Authorization Request Header.
It also supports a couple of proprietary IdP extensions as described below.
Supported OAuth2 Authorization Grants
The following OAuth2 Authorization Grants are supported:
- Authorization Code Grant
- Implicit Code Grant
- Resource Owner Password Grant
- Client Credentials Grant
- Refresh Grant
- Device Authorization Grant
Supported OIDC Authentication Flows
The following OpenID Connect Authentication Flows are supported
- Authorization Code Flow (could also use Authorization Code Grant option and scope=”openid profile”)
- Implicit Flow (2 variants)
- Hybrid Flow (3 variants)
Privacy & Security
This project is built with your privacy and security as a priority. There is, however, one consequence of how the public site is hosted that you should be aware of.
The public site (for example, the hosted idptools.com / test.idptools.com deployments) is served as static content — there is no application backend. Because of this, when your Identity Provider redirects back to the debugger, the authorization code (along with the other OAuth2/OIDC response parameters and the redirect URI) is delivered to the debugger page through the static hosting provider as part of the normal page request. This is an unavoidable property of a static, backend-less build of an OAuth2/OIDC client.
To be clear about what we do with that data:
- We do not log any of the query parameters, fragments, authorization codes, tokens, or redirect URIs that are sent to the site as part of normal debugger operations.
- All token handling, decoding, and validation happens client-side in your browser; your configuration is stored only in your browser’s
localStorage.
If sending authorization codes to a third-party hosting provider is not acceptable for your use case (for example, when testing against a production Identity Provider), we strongly encourage you to run a local build of the debugger so that nothing leaves your machine. See Getting Started / running locally below — in short:
./generate-tls-cert.sh                 # once per checkout: the TLS pair
sudo CONFIG_FILE=./env/local.js docker-compose up
Then use the debugger at https://localhost:3000, and register https://localhost:3000/callback as your redirect URI with your Identity Provider. The certificate is self-signed and generated per checkout by ./generate-tls-cert.sh, so your browser will ask you to accept it once; that script prints its SHA-256 fingerprint. In a local build, the authorization code is delivered to the debugger running on your own machine and never transits a third-party host.
AI Coding Tool Disclosure
As of Q1, 2026, Anthropic Claude was used to implement some new features of this project. All code is reviewed by a human before being merged into the main branch.
Tested Platforms
So far, this tool has been tested with the following OAuth2 or OIDC implementations:
- Red Hat SSO v7.1 (OAuth2 + OIDC)
- 3Scale SaaS with self-managed APICast Gateway (OAuth2 + OIDC)
- Azure Active Directory / EntraId (v1 endpoints, OIDC + OAuth2)
- Azure Active Directory / EntraId (v2 endpoints, OIDC + OAuth2)
- Apigee Edge (OAuth2, with caveats described here)
- Ping Federate (OAuth2 + OIDC)
- AWS Cognito (OAuth2 + OIDC)
- Facebook (OAuth2)
- Google STS (OAuth2 + OIDC)
- KeyCloak (recent versions used in our automated test suite, Red Hat SSO is KeyCloak under the Red Hat banner, so it should work)
- Okta (OIDC + OAuth2)
- Auth0 (OIDC + OAuth2)
- ForgeRock (OIDC + OAuth2 + SAML2)
- Walt.ID (VC Issuance + Presentation)
3Scale Usage Notes
The version of 3Scale SaaS + APICast only supports OAuth2; 3Scale can support the OIDC Authorization Code Flow since the response_type and grant_type values match OAuth2’s Authorization Code Grant. The other OIDC Authentication Flows are not supported by 3Scale OAuth2. The latest version of 3Scale on-premise has OIDC support. As of 12/3/2017, I haven’t been able to test this yet.
Azure Active Directory Usage Notes
Azure Active Directory (v1 endpoints) support OIDC Authorization Code Flow, Implicit Flow, and the Hybrid Flow with response_type=”code id_token”.
Apigee Edge Usage Notes
Apigee Edge supports OAuth2 by providing the building blogs of an OAuth2 Provider. The developer has much leeway in how the pieces are used. This debugger can only be used with Identity Providers that adhere to the spec.
AWS Cognito Usage Notes
AWS Cognito has been tested with the OIDC Authorization Code Flow (with a user defined in a user pool and with a facebook federation relationship. Cognito supports federation, but has optional parameters that need to be passed in to tell Cognito which Userpool and Identity Provider to use (like Facebook). The debugger does not support passing in these parameters at this time (we’ll call that a future enhancement). It appears to have worked because I tested in a browser session where I had previously authenticated against Cognito using Facebook. Also, when the refresh grant is used, it works without issue the first time; however, the refresh grant response does not include a new refresh token. So, the refresh_token is not prepopulated correctly. The original refresh token can be copied into the field and subsequent refresh token calls will work. I admit I didn’t test all possible scenarios, but I imagine that once the refresh token expires, it will issue a new refresh token. Another interesting note that mattered a lot in a recent project, each refresh token grant response has a new ID Token–and, access token, of course.
Facebook Usage Notes
Facebook OAuth2 was tested with the OAuth2 Authorization Code Grant. It worked, but there was no refresh token provided in the OAuth2 Token Endpoint response. So, the refresh grant is obviously not going to work. Configuration details can be found here.
Google+ Usage Notes
Google+ login was tested with the Authorization Code3 Grant. It worked. No refresh token was provided. Configuration details can be found here.
General Usage Notes
Note, that all configuration values except for the user password is written to local storage to prepopulate fields later. If this is not desired, clear your browser’s local storage for the debugger when done using.
The debugger has been tested with recent versions of Chrome.
Getting Started
If you have docker / docker-compose installed already:
git clone --recurse-submodules https://github.com/rcbj/id-proto-debugger.git
cd id-proto-debugger
sudo CONFIG_FILE=./env/local.js docker-compose build
./generate-tls-cert.sh                 # once per checkout: the TLS pair
sudo CONFIG_FILE=./env/local.js docker-compose up
Note, you will need at least 950MB of disk space ree in order to build this Docker image.
--recurse-submodules matters: the mock STS the test suite and the local stack
run against lives in its own repository, rcbj/mock-sts,
and is linked here as the sts/ submodule. Cloned without it, sts/ is an empty
directory and the build fails with failed to read dockerfile. In a checkout that
is already in that state:
git submodule update --init
--recursive, not plain --init. The mock STS has a submodule of its own —
node-ldapjs, which its package.json
takes as "ldapjs": "file:node-ldapjs" — and --init alone stops one level
short of it. An uninitialised submodule is an empty directory rather than a
missing one, so the image builds perfectly well, npm installs a package with no
main, and the sts container dies at startup with Cannot find module
'ldapjs': a message naming a package, not a submodule.
The test launchers do this for you — requireMockStsCheckout() in
common/common.sh, which checks the nested one too — but a
bare docker-compose build does not.
There is a second submodule, rcbj/node-ldapjs
at api/node-ldapjs/ (branch master): a fork of ldapjs for the LDAP support
of issue #257, pinned at the final commit its maintainer left behind when the
project was decommissioned on 2024-05-14 — which is why it is a submodule rather
than a dependency in api/package.json. Nothing builds from it yet, so an
uninitialised api/node-ldapjs/ does not break anything today; the bare
git submodule update --init above takes it along with sts/ regardless.
From a bash command prompt on Fedora or RHEL 7.x, run the following::
dnf install git # Or, yum install git
git clone --recurse-submodules https://github.com/rcbj/id-proto-debugger.git
dnf install docker
systemctl start docker
cd id-proto-debugger
sudo CONFIG_FILE=./env/local.js docker-compose build
./generate-tls-cert.sh                 # once per checkout: the TLS pair
sudo CONFIG_FILE=./env/local.js docker-compose up
Clean Up / Start Over
This is a nuclear option to cleanup docker. You may not want to do this if you have other important things running on your site.
- List all containers (only IDs)
sudo docker ps -aq - Stop all running containers:
sudo docker stop $(docker ps -aq) - Remove all containers:
sudo docker rm $(docker ps -aq) - Remove all images:
sudo docker rmi $(docker images -q) - Prune volumes:
sudo docker volume prune --all --force - Remove all volumes:
sudo docker volume rm $(sudo docker volume ls | awk '{ print $2 }') - Remmove all networks:
sudo docker network prune -f
On other systems, the commands needed to start the debugger in a local docker container will be similar. The docker Sinatra/Ruby runtime will have to be able to establish connections to remote IdP endpoint (whether locally in other docker containers, on the host VM, or over the network/internet). On the test system, it was necessary to add “–net=host” to the “docker run” args. The network connectivity details for docker may vary from platform-to-platform.
Running
- Open your favorite browser and enter “https://localhost:3000” in the address bar.
- Choose the OAuth2 Grant or OIDC Flow that you want to test.
- Enter the Authorization Endpoint.
- Enter the Token Endpoint.
OAuth2 AUthorization Grant:
- Enter the client identifier.
- Enter the Redirect URI (use https://localhost:3000/callback by default)
- Enter the scope information.
- If you need to provide a resource parameter, click the radio button. Then, enter the desired resource parameter.
- Click the Authorize button.
- Authenticate the user.
- Scroll down to the “Exchange Authoriztaion Code for Access Token” Section.
- Verify that the Code field is filled in below in the Token Step section.
- Enter the client identifier
- Enter the client secret if this is a confidential client.
- Enter the scope information.
- If a resource is needed, click Yes. Enter the resource information in the Resource field.
- If the IdP is using a self-signed certificate or a cert issued from a non-public CA, click No next to the “Validate IdP Certificate?” question. Note, certificates signed by public CAs are validated against the trusted CAs included with the Ruby 2.4.0 docker image.
- Click the Get Token button.
- The standard tokens that are returned from the token endpoint are displayed at the bottom.
OAuth2 Implicit Grant:
- Enter the client identifier.
- Enter the Redirect URI (use https://localhost:3000/callback by default)
- Enter the scope information.
- If you need to provide a resource parameter, click the radio button. Then, enter the desired resource parameter.
- Click the Authorize button.
- Authenticate the user.
- The access_token will be listed at the bottom of the screen.
Refresh Token Grant
- In the configuration section, click the the “Yes” radio button next to “Use Refresh Token”. This will make the Refresh Token Section appear.
- The refresh token is automatically populated from the Token Endpoint call response.
- Enter the client identifier.
- Enter the client secret.
- Enter the scope.
- Press Enter. For the other grants and flows, similar steps to the above are used.
See the blog posts for more information.
Running tests
To run the docker-based tests locally, run the following commmand:
sudo CONFIG_FILE=./env/local.js docker compose -f docker-compose-run-tests.yml up --abort-on-container-exit
To run tests locally, run: ./local-run-tests.sh
If you need to pop up the browser for troubleshooting, pass in the –browser option to the test scripts.
To generate a code coverage report, run ./run-coverage.sh. The report will be under the coverage directory.
The mock STS is a submodule
Everything the suite needs on the other side of a protocol — the WS-Trust STS, the SAML 2.0 IdP endpoints, the OAuth 2.0 / OIDC authorization server, the OID4VCI Credential Issuer, the OID4VP Verifier and the did:web document — is one small Node service that used to live in sts/ in this repository and now lives in rcbj/mock-sts. This repository records a link to it (branch main) as the sts/ submodule; the code is fetched, not vendored.
Two things build from it, and both fail unhelpfully if the submodule was never initialised:
| What | Where | What it says when sts/ is empty |
|---|---|---|
| the STS image | context: ./sts in all four compose files |
failed to read dockerfile |
| the tests image | COPY sts/common/vendored/bbs2023.js in tests/Dockerfile, so tests/bbs2023_cryptosuite.js can check the wallet’s cryptosuite against the issuer’s |
COPY sts/common/vendored/bbs2023.js: not found |
Neither message mentions a submodule, so every launcher (./docker-run-tests.sh, ./local-run-tests.sh, ./remote-run-tests.sh, ./run-coverage.sh) calls requireMockStsCheckout() from common/common.sh before building: it initialises the submodule if it can and stops the run with the reason if it cannot. The CI workflows that build the stack check out with submodules: true for the same reason.
By default the build uses the commit this repository records, which is what makes a run repeatable. To build against the tip of main instead, set MOCK_STS_TRACK_REMOTE=1 — that is git submodule update --remote, so the run is no longer repeatable and git status will show the submodule pointer as modified.
The SAML SP key pair
The SAML tests sign the AuthnRequest and LogoutRequest, and decrypt an encrypted assertion, with a Service Provider key pair. No key pair is stored in this repository. generateSpKeyPair() in common/common.sh creates a fresh self-signed RSA 2048 pair at the start of every run — in a temporary directory that is deleted as soon as the PEMs have been read — and exports it:
| Variable | What it is | Who uses it |
|---|---|---|
SAML_SP_PRIVATE_KEY |
the private key, PEM | the tests, via common/sp_keypair.js — pasted into the debugger’s SP key fields to sign and to decrypt |
SAML_SP_CERT |
the matching certificate, PEM | the tests, as the SP public key |
SAML_SP_SIGNING_CERT |
the same certificate as base64 DER | configureKeycloak, which registers it on the SAML client so Keycloak validates the request signature |
So the key exists only in the environment of the run that generated it: on the host for ./local-run-tests.sh and ./remote-run-tests.sh, and inside the tests container for the fully-containerized suite (tests/run-tests-in-container.sh generates its own, so nothing is baked into the image). The generator turns the shell’s set -x trace off around the key material and logs only a SHA-256 fingerprint, so the private key never reaches a build log.
Running a single SAML test script by hand needs those variables in the environment — its certificate is what Keycloak was told to trust, so a self-generated pair would not validate. The scripts say so and stop if they are missing.
Prerequisites
To run this project you will need to install docker.
Building the docker image
yum install git
git clone --recurse-submodules https://github.com/rcbj/id-proto-debugger.git
yum install docker
systemctl start docker
cd id-proto-debugger
sudo docker build -t rcbj/debugger-client --build-arg CONFIG_FILE=./env/local.js -f client/Dockerfile .
sudo docker run -p 3000:3000 -e CONFIG_FILE=./env/local.js -d rcbj/debugger-client
sudo docker build -t rcbj/debugger-api --build-arg CONFIG_FILE=./env/local.js -f api/Dockerfile .
sudo docker run -p 4000:4000 -e CONFIG_FILE=./env/local.js -d rcbj/debugger-api
On other systems, the commands needed to start the debugger in a local docker container will be similar. The docker Sinatra/Ruby runtime will have to be able to establish connections to remote IdP endpoint (whether locally in other docker containers, on the host VM, or over the network/internet). On the test system, it was necessary to add “–net=host” to the “docker run” args. The network connectivity details for docker may vary from platform-to-platform.
Embedded in the mock STS
The debugger has a third deployment shape besides the containers above and the static idptools.com build: embedded inside the mock STS, which serves the UI from a listener of its own behind an OIDC sign-in and runs the api as a child process on a unix socket behind its own proxy. This repository builds the tree that service consumes:
git submodule update --init --recursive
embedded/build.sh --out /path/to/tree          # without docker
docker build -f embedded/Dockerfile -t rcbj/id-proto-debugger-embedded:dev \
  --build-arg GIT_COMMIT=$(git rev-parse --short=12 HEAD) .
Nothing about the standalone debugger changes. The contract — the tree, the
DEBUGGER_* environment the api child reads, and the address allow-list it
enforces — is in embedded/CLAUDE.md.
Additional Feature Information
RFC 9700 compliance mode
The Configuration Parameters pane of the OAuth2 / OIDC workflow carries a checkbox, Enforce RFC 9700 client requirements, at the top — above the grant selector, because it governs every control below it. It turns the client-side half of RFC 9700, Best Current Practice for OAuth 2.0 Security, from advice into enforcement on both pages of the workflow.
It ships OFF, and that is deliberate rather than cautious. A debugger exists to be pointed at identity providers that are wrong — that is most of what anybody uses one for. An authorization response with no state on it is a finding worth seeing, and a client that refuses to send the request cannot show it to you; an OP that still only speaks the Implicit Grant is something somebody has to work with today, and a mode that removes it from the dropdown removes their reason for opening the page. With the box clear, this workflow behaves exactly as it did before the feature existed: no check runs, no report is drawn, nothing is refused.
With it ticked, in outline:
- the three Implicit variants, the two Hybrid flows that carry
token, and the Resource Owner Password Credentials grant are disabled in the selector, each with its own reason — and refused again at the request, becausedisabledis a property of a control while the rule is a property of the request. OIDC Hybrid (code id_token) survives: it returns no access token from the authorization endpoint; - PKCE is forced on with S256, certificate validation is forced on,
client_secret_basicis selected, and DPoP is switched on together with the front-end token call (a proof cannot ride on the proxied one); state,nonceand the PKCE verifier are regenerated per request and frozen onto a transaction record insessionStorage— per-tab, dying with the browsing session, which is what “bound to the user-agent transaction” means;- every endpoint must be https (with RFC 8252’s loopback exception, which is what lets the mode be used against a local stack at all), and the endpoints must have come from the server’s metadata rather than been typed;
response_mode=form_postis requested when the server advertises it and this build has a/callbackto receive the POST, so the response never reaches the address bar at all; whatever does reach it is removed withhistory.replaceStateas soon as it has been read;- on the way back,
statemust match and is single-use, the RFC 9207issparameter must match the stored issuer (and its absence is fatal when the server advertises support for it), and the ID Token’sissmust match too; - no token is used until the ID Token’s
noncehas been validated — not rendered, not written to Token History, not offered to the UserInfo or refresh panes. A mismatch discards the whole set; - an authorization code is presented once, and a rotated refresh token spends the one it replaced;
- the audience, the granted scope, the
token_typethat came back, whether the refresh token was rotated, and whether the subject is confusable with theclient_idare reported rather than enforced, because a client can only observe them.
A report appears beside each step naming the requirement, the level RFC 9700 states it at, and what was found.
Four of the fifteen sections are not behind the checkbox, because they are this deployment’s own posture and are invisible to any identity provider: /callback is not an open redirector and never takes its destination from the request, it redirects with 303 rather than 302 or 307, every response carries Referrer-Policy: no-referrer, X-Frame-Options: DENY and Content-Security-Policy: frame-ancestors 'none', and this workflow uses no browser messaging at all.
One thing is deliberately not implemented: private_key_jwt and mutual-TLS client authentication. RFC 9700 recommends asymmetric client authentication and this workflow offers client_secret_basic and client_secret_post only; the mode reports the gap rather than pretending otherwise.
docs/rfc9700.md is the full account — every requirement, what is enforced and what is only detected, and how the two tests (tests/rfc9700_client.js, tests/rfc9700_flows.js) exercise it against the mock STS running in its RFC 9700 mode.
State Parameters
- A state parameter can be submitted as part of the authorization endpoint request. The state parameter will be validated when the redirect comes back to the registered callback endpoint. A UUID is used as the state value. This is an optional, but recommended parameter.
Custom Parameters
Various specs & RFCs that build on the OAuth2 & OIDC protocols add additional parameters that must be passed to the Authorization Endpoint and Token Endpoint. The debugger supports passing up to ten custom parameters.
Nonce Parameter
A nonce parameter can be included in the Authorization Endpoint call. A UUID is used as the nonce value.
Token Details
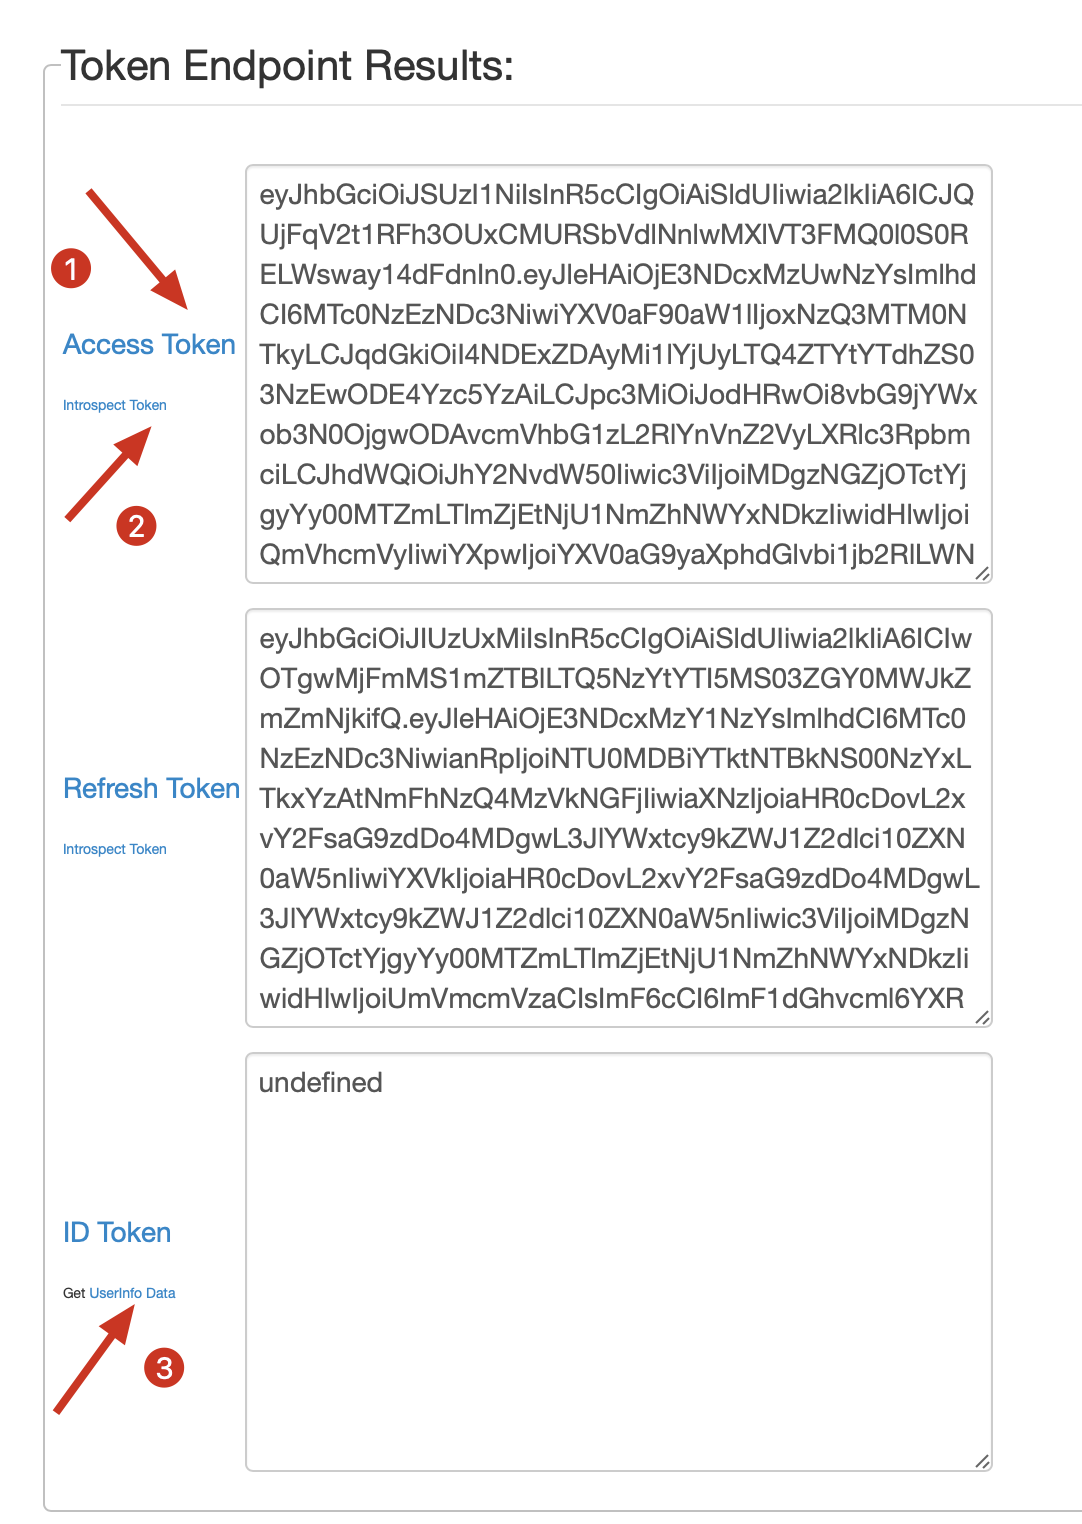
All tokens (Access, Refresh, ID) returned by the IdP can have their details viewed by clicking on the link next to the token on the Debugger2 page.
This feature currently only supports JWT tokens, but in the future will support other token types.
There are two views: raw-JSON or table view.
The table view will display a claim description for spec-defined claims.
Some caveats to keep in mind:
- If nothing is displayed, then the requested token retrieved from the endpoint is not a JWT or not a valid JWT.
- In the future, additional token formats may be added.
- Although, many leading IdPs use JWT as the format for OAuth2 access tokens and refresh tokens. The spec does not require this.
- Some IdPs intentionally use opaque tokens that have no deeper meaning than to be a randomly generated identifier that points back to session information stored on the IdP
OIDC RP-Initiated Logout Spec Support
If the Logout URL can be read from the OIDC Discovery Endpoint, it will be automatically populated; otherwise, you will need to manually copy in this URL.
The associated refresh token should be invalidated at this point. The corresponding JWT tokens could still be validated unless you compare them against the Introspection Endpoint.
JWT Validation
The detail view screen for tokens can validate a JWT token signature.
It can take a JWKS Endpoint or certificate directly.
JWT Tools
The JWT Tools page (/jwt_tools.html) is a standalone, browser-only workbench for building, signing, encrypting, verifying, and decrypting JSON Web Tokens. It implements JWS (RFC 7515), JWE (RFC 7516), JWT (RFC 7519), and the JOSE algorithms of JWA (RFC 7518) plus EdDSA (RFC 8037).
All cryptography runs in your browser via the Web Crypto API (crypto.subtle). No key material — private keys, HMAC secrets, generated key pairs, or passwords — is ever written to localStorage or sent to a server. Because Web Crypto is only available in a secure context, use the page over https:// or http://localhost.
Reach it from the Tools pane on oauth2_oidc_1.html or oauth2_oidc_2.html, or browse directly to /jwt_tools.html. The “← Return to debugger” link sends you back to whichever debugger page you came from. Every multi-line field has a Copy button, and hovering any field shows a tooltip describing it.
The page is three side-by-side panes that map to the lifecycle of a token:
| Pane | Title | What it does |
|---|---|---|
| #1 | Compose | Build the JWT Header and Payload; decode a pasted token |
| #2 | Sign (JWS) | Generate keys, sign the token, and validate a signature |
| #3 | Encrypt (JWE) | Generate keys, encrypt the token, and decrypt a JWE |
The typical order is Compose (#1) → Sign (#2) → Encrypt (#3), and the reverse for inspection: Decrypt (#3) → Validate signature (#2).
Pane #1 — Compose
Author the token. Three text areas plus helpers:
- JWT Header — the JOSE header, as JSON. Pre-populated with a sample (
alg,typ,kid). - JWT Payload — the claims set, as JSON. Pre-populated with RFC 7519 registered claims (
iss,sub,aud,exp,nbf,iat,jti) and placeholder values. - Encoded JWT — the compact-serialized token. This field is two-way: editing the Header or Payload rebuilds it as
BASE64URL(header).BASE64URL(payload).(an unsigned token — note the trailing dot); pasting a token into it decodes the header and payload back into the fields on the left. If the pasted token carries a signature, the whole token is also copied into the Sign pane’s JWT to Verify and Signed JWT fields.
A status line reports the sync state or any JSON parse error.
Add Custom Claim — insert a claim without hand-editing JSON: enter a name and value, pick a value type (String, Number, Boolean, or JSON — the last parses arbitrary JSON), pick a target (Payload or Header), and click Add.
Buttons:
- Generate RFC 9068 Token — overwrites the Header/Payload/Encoded JWT with a sample OAuth 2.0 JWT access token (RFC 9068): header
typisat+jwtwith the required access-token claims. The sample is unsigned — sign it in Pane #2. - JWT RFC Compliance — validates the current token against the JWT/JWS specs (RFC 7519 / RFC 7515) and writes a PASS/FAIL report to Compliance Output.
- RFC 9068 Compliance — validates the current token specifically as an OAuth 2.0 JWT access token.
Pane #2 — Sign (JWS)
Generate a signing key pair (or HMAC secret), sign the composed token, and validate signatures. The Signing Algorithm dropdown drives everything in this pane — it determines what key material Generate Keys produces and how the token is signed.
| Option | Family | Key generated |
|---|---|---|
RS256 / RS384 / RS512 |
RSASSA-PKCS1-v1_5 | RSA key pair (size from the Key Size dropdown) |
PS256 / PS384 / PS512 |
RSASSA-PSS | RSA key pair (size from the Key Size dropdown) |
ES256 / ES384 / ES512 |
ECDSA | EC key pair on P-256 / P-384 / P-521 |
EdDSA |
EdDSA (RFC 8037) | OKP key pair on Ed25519 |
HS256 / HS384 / HS512 |
HMAC (symmetric) | a random shared secret (no key pair) |
The dropdown is read when you click a button and is not “sticky” to already-generated keys. Pick the algorithm first, then Generate Keys → Sign. If you switch to a different algorithm family after generating keys, regenerate them before signing.
Key generation & display:
- Generate Keys — creates key material for the selected algorithm and fills the key fields.
- RSA Key Size — for the RSA families (
RS*/PS*), selects the modulus size: 2048 (default), 3072, 4096, or 1024 (insecure). Ignored for EC, EdDSA, and HMAC, whose sizes follow the chosen curve/algorithm. - Private Key (PKCS#8) / HMAC Secret and Public Key (SPKI) — the key pair (HMAC shows only a base64url secret; the public field carries a notice). You may also paste your own PEM or JWK material.
- Show keys as JWK (off = PEM) — a toggle that converts both key fields between PEM (default) and JWK in place.
Downloading keys: choose a Keystore format (PEM, JWK, DER, PKCS#12) and an optional Password (which encrypts the private key: PBES2-encrypted PEM/DER, a PBES2 JWE for JWK, and required for PKCS#12), then Download Keys. DER produces two files (private + public). PKCS#12 export is not available for EdDSA keys in-browser — use PEM, DER, or JWK.
Signing: Generate Signed JWT signs BASE64URL(header).BASE64URL(payload) with the Private Key / HMAC Secret and forces the header alg to match your selection. The result is written to Signed JWT (read-only), the Encoded JWT box in Pane #1, the JWT to Verify box below, and the Payload to Encrypt box in Pane #3 (ready to nest inside a JWE).
Validate a Signature (sub-section): verify any JWS — the one you just produced or one you paste in.
- JWT to Verify — defaults to the just-signed token. Verification uses the
algin the pasted token’s header, not the dropdown above. - Verification Type:
HMAC Secret— verify a symmetric (HS*) signature with the secret.X.509 Certificate (PEM)— verify with a public key / certificate (auto-populated from the public key you generated).JWKS (JSON)— paste a JWKS document; the key is chosen by the token’skid. (Currently supports RSA keys.)JWKS (URL)— same, but the JWKS is fetched from a URL.
- Verification Key / URL — the secret, PEM/cert, JWKS JSON, or URL.
- Verify — writes
Signature Verified: true|false(or an error) to Verification Output.
Pane #3 — Encrypt (JWE)
Encrypt the token (or any payload) into a JWE, and decrypt JWEs. JOSE encryption uses two algorithms: a key-management algorithm (alg, which uses the recipient’s key pair) and a content-encryption algorithm (enc, which encrypts the body with a symmetric Content Encryption Key).
Key Management (alg):
| Option | Mechanism | Recipient key |
|---|---|---|
RSA-OAEP |
RSA-OAEP (SHA-1), wraps a random CEK | RSA key pair |
RSA-OAEP-256 |
RSA-OAEP (SHA-256), wraps a random CEK | RSA key pair |
ECDH-ES |
ECDH key agreement, direct (the agreed key is the CEK) | EC key pair (P-256) |
ECDH-ES+A128KW / +A192KW / +A256KW |
ECDH agreement derives a key-wrapping key that AES-KW-wraps a random CEK | EC key pair (P-256) |
Content Encryption (enc): A256GCM, A192GCM, A128GCM (AES-GCM authenticated encryption).
Key generation & display: Generate Keys creates the recipient key pair for the selected key-management algorithm (RSA for RSA-OAEP*; EC P-256 for all ECDH-ES*), shown as Recipient Public Key (SPKI) and Recipient Private Key (PKCS#8). A RSA Key Size dropdown (2048 default / 3072 / 4096, or 1024 insecure) sets the modulus for the RSA-OAEP* algorithms and is ignored for ECDH-ES*. The Show keys as JWK toggle and the keystore format / password / Download Keys controls behave exactly as in Pane #2.
Encrypting: Payload to Encrypt defaults to the Signed JWT from Pane #2 (a nested JWT); you can encrypt any text. Encrypt JWT produces a 5-part compact JWE (protected.encrypted_key.iv.ciphertext.tag) using the recipient public key, the selected alg/enc, and a fresh random IV. If the payload is itself a JWS, the protected header is marked cty:"JWT" (RFC 7519 §5.2); for ECDH-ES* the ephemeral public key is added as epk. The result is written to Encrypted JWT (JWE), the JWE to Decrypt box below, and the Encoded JWT box in Pane #1. Encryption adds the JWE parameters (enc, cty, epk, …) to the Pane #1 Header but preserves the JWS signing alg (a JWS alg and a JWE alg are distinct header parameters).
Decrypt a JWE (sub-section): JWE to Decrypt defaults to the JWE you just produced (paste any compact JWE); decryption uses the Recipient Private Key above. Decrypt JWT recovers the plaintext (for a nested JWT, the inner JWS) into Decryption Output. The alg/enc are read from the JWE’s own protected header.
Valid algorithm combinations
Signing (Pane #2) is a single choice, while encryption (Pane #3) is a combination of a key-management algorithm (alg) and a content-encryption algorithm (enc). Signing and encryption are independent stages, so a signed-then-encrypted (nested) token can pair any signing algorithm with any valid encryption combination.
Signing algorithms (Pane #2) — 13 standalone choices; pick one:
| Family | Algorithms |
|---|---|
| HMAC (symmetric) | HS256, HS384, HS512 |
| RSASSA-PKCS1-v1_5 | RS256, RS384, RS512 |
| RSASSA-PSS | PS256, PS384, PS512 |
| ECDSA | ES256 (P-256), ES384 (P-384), ES512 (P-521) |
| EdDSA | EdDSA (Ed25519) |
Encryption combinations (Pane #3) — every alg × enc pairing is cryptographically valid (18 total). Choose one cell — one Key Management algorithm and one Content Encryption algorithm:
Key Management (alg) ↓ / Content Encryption (enc) → |
A128GCM |
A192GCM * |
A256GCM |
|---|---|---|---|
RSA-OAEP |
✓ | ✓ * | ✓ |
RSA-OAEP-256 |
✓ | ✓ * | ✓ |
ECDH-ES (P-256, direct) |
✓ | ✓ * | ✓ |
ECDH-ES+A128KW (P-256) |
✓ | ✓ * | ✓ |
ECDH-ES+A192KW (P-256) * |
✓ * | ✓ * | ✓ * |
ECDH-ES+A256KW (P-256) |
✓ | ✓ * | ✓ |
* AES-192 caveat. The 192-bit AES algorithms — content encryption
A192GCMand key managementECDH-ES+A192KW— are not supported in Chromium-based browsers (Chrome, Edge, and the Selenium test harness) because BoringSSL omits 192-bit AES; attempting them raises a “192-bit AES keys are not supported” error. They work in Firefox and in Node/OpenSSL. If you need broad browser compatibility, use the 128- or 256-bit variants. The other 12 combinations work everywhere.
Nested (signed + encrypted) tokens. Because you sign in Pane #2 and then encrypt the resulting JWS in Pane #3, any of the 13 signing algorithms can be nested inside any of the 18 encryption combinations (subject to the AES-192 caveat above).
End-to-end walkthrough
Build → sign → encrypt:
- Pane #1 – Compose. Edit the Header and Payload, or click Generate RFC 9068 Token. Optionally check compliance.
- Pane #2 – Sign. Choose a Signing Algorithm, click Generate Keys, then Generate Signed JWT. The signed token flows into Pane #3’s Payload to Encrypt.
- Pane #3 – Encrypt (optional). Choose Key Management + Content Encryption, click Generate Keys, then Encrypt JWT to wrap the signed JWT in a JWE.
Inspect an existing token — decrypt → validate:
- Pane #3 – Decrypt. Paste the JWE into JWE to Decrypt, provide/generate the recipient private key, and click Decrypt JWT. The inner JWS appears in Decryption Output.
- Pane #1. Paste the JWS into Encoded JWT to decode its header and payload (this also loads it into the Sign pane’s JWT to Verify).
- Pane #2 – Validate a Signature. Pick the Verification Type, supply the key/JWKS/secret, and click Verify.
Notes & limitations
- Web Crypto only. Algorithms are limited to what the browser’s Web Crypto API supports.
RSA1_5(RSAES-PKCS1-v1_5 key management) and Ed448 are spec-defined but unavailable in Web Crypto, and are not offered. - HMAC is symmetric — no key pair, no X.509 form, and JWK-only export.
- JWKS verification matches on
kidand currently supports RSA keys. - Secure context required.
crypto.subtleis only present over HTTPS or onlocalhost. - No persistence. Keys and secrets live only in the page for the current session.
Encoding / Hashing Tools
The Encoding / Hashing Tools page (/encoding_tools.html) is a standalone, browser-only utility for the small conversions that come up constantly when working with tokens: Base64, URI (percent) encoding, checksums, and SHA hashing. Everything runs in your browser and nothing is stored or sent to a server.
Reach it from the Tools pane on oauth2_oidc_1.html or oauth2_oidc_2.html, or browse directly to /encoding_tools.html. The “← Return to debugger” link sends you back to whichever debugger page you came from. Every field has a Copy button and a hover tooltip, and on load each Unencoded value is pre-populated with a sample and its Encode/hash is run automatically so the Encoded fields are filled immediately.
The page has four panes. Each follows the same layout — an Unencoded value box, an Encoded box, and one or two action buttons — with a status line reporting the result or any error:
| Pane | Title | Buttons | Direction |
|---|---|---|---|
| #1 | Base64 | Encode, Decode | two-way |
| #2 | URI Encoding | Encode, Decode | two-way |
| #3 | Checksum (CRC-32) | Encode | one-way |
| #4 | SHA Hashing | Encode (+ size dropdown) | one-way |
Pane #1 — Base64
- Encode — Base64-encodes the Unencoded value (UTF-8) into the Encoded box.
- Decode — Base64-decodes the Encoded value back into Unencoded value.
Uses standard Base64 (RFC 4648, i.e. the + / / alphabet with = padding), not base64url, and is UTF-8 aware. The status line reports the byte count, or a clear error if the Encoded text is not valid Base64.
Pane #2 — URI Encoding
- Encode — percent-encodes the Unencoded value (equivalent to JavaScript
encodeURIComponent), so reserved characters such as space,&,=,/,?, and#become%NN. - Decode — reverses it (
decodeURIComponent).
The status line reports success, or an error for malformed percent-encoding.
Pane #3 — Checksum (CRC-32)
A checksum is one-way, so this pane has only an Encode button (no Decode — a checksum cannot be reversed to recover the input). Encode computes the CRC-32 (IEEE 802.3, reflected) of the Unencoded value and writes it to the read-only Encoded box as 8 hexadecimal digits.
CRC-32 is a fast, non-cryptographic integrity check (detects accidental corruption). It is not a secure hash — do not use it where collision resistance matters.
Pane #4 — SHA Hashing
Also one-way (Encode only). Choose a digest from the size dropdown and click Encode to write the hex digest to the read-only Encoded box.
| Option | Digest length |
|---|---|
SHA-256 (default) |
256-bit (64 hex chars) |
SHA-1 |
160-bit (40 hex chars) |
SHA-384 |
384-bit (96 hex chars) |
SHA-512 |
512-bit (128 hex chars) |
SHA hashing uses the Web Crypto API (crypto.subtle.digest), which is only available in a secure context — use the page over https:// or http://localhost. SHA-1 is offered for interoperability with legacy systems but is cryptographically broken; prefer SHA-256 or larger for security.
Notes & limitations
- Base64, URI, and CRC-32 are pure JavaScript and work in any browser (no secure context required). SHA hashing requires Web Crypto, hence a secure context.
- Checksum and SHA are one-way — there is intentionally no Decode.
- No persistence — all values live only in the page for the current session.
Digital Signature
The Digital Signature page (/digital_signature.html) is a standalone, browser-only workbench for generating keys, signing/MACing arbitrary values, and validating them across classical, elliptic-curve, and post-quantum signature schemes — plus symmetric MACs.
All cryptography runs in your browser using pure-JavaScript libraries — node-forge (RSA, AES), @noble/curves (ECC), @noble/post-quantum (SLH-DSA / ML-DSA), and @noble/hashes (hashes, HMAC, KMAC, keyed BLAKE). BBS is this project’s own implementation of draft-irtf-cfrg-bbs-signatures over @noble/curves’ BLS12-381 — the same module the SD-JWT VC workflow signs bbs-2023 credentials with. Signing deliberately does not use the Web Crypto API: crypto.subtle supports only the SHA family, whereas these panes let you pair RSA/ECDSA with a wide range of hashes. No key material is stored: keys live only in this page and are never written to local storage.
Reach it from the Tools pane on oauth2_oidc_1.html or oauth2_oidc_2.html, or browse directly to /digital_signature.html. Every field has a Copy button and a hover tooltip, and the “← Return to debugger” link goes back to whichever page you came from. Each pane is collapsible — click its title to collapse/expand it, or use the Expand all / Collapse all buttons at the top — to save screen space on this long page.
Each pane carries an Asymmetric or Symmetric (MAC) badge. The asymmetric panes are true digital signatures (public/private key pair, non-repudiation); the symmetric panes are MACs — a shared secret gives integrity + origin but no non-repudiation or public verifiability, so a MAC is not a digital signature.
Asymmetric — digital signatures:
| Pane | Scheme | Algorithms |
|---|---|---|
| SLH-DSA (FIPS 205, post-quantum) | hash-based | 12 parameter sets (SHA2/SHAKE × 128/192/256 × s/f) |
| RSA | PKCS#1 v1.5 & PSS, any hash | 2048/3072/4096/1024-bit keys |
| ECC | ECDSA (P-256/384/521, secp256k1) any hash; EdDSA (Ed25519/Ed448); Schnorr (BIP-340); BLS (BLS12-381) | |
| ML-DSA (FIPS 204, post-quantum) | lattice-based | ML-DSA-44 / 65 / 87 |
| BBS (draft-irtf-cfrg-bbs-signatures) | pairing-based, multi-message + selective disclosure | BLS12-381-SHA-256 and BLS12-381-SHAKE-256 |
Symmetric — MACs:
| Pane | Family | Algorithms |
|---|---|---|
| Keyed-Hash MACs | keyed hashing | HMAC (SHA-256/384/512, SHA3-256/512, SHA-1); KMAC128/256; keyed BLAKE2b/BLAKE2s/BLAKE3 |
| Block-Cipher MACs | AES | AES-CMAC; AES-CBC-MAC (legacy); AES-GMAC (fixed-nonce demo) |
| Universal-Hash MACs | universal hashing | Poly1305 (one-time key); SipHash-2-4 |
Common layout
Every pane has the same controls (the BBS pane adds to them — it signs a message list and has a proof section; see Pane #5):
- Value — the message to sign or validate (any text).
- Signature (Base64) — produced by Sign; paste one here to validate.
- Key Pair — an algorithm/curve/parameter dropdown, a Generate Keys button, and the private + public key fields (PEM for RSA/SLH-DSA/ML-DSA; raw hex for ECC).
- Download Keys — a keystore-format dropdown (PEM / JWK / DER / PKCS#12) and an optional password (see the matrix below).
- Sign / Validate Signature buttons, and a status line reporting the result (
Signature VALID ✓/INVALID ✗) or any error.
The algorithm/curve dropdown is read at click time and is not sticky to already-generated keys — pick the algorithm first, then Generate Keys → Sign. A mismatch is caught and reported in the status line.
Hashes (RSA and ECDSA)
The RSA pane and the ECDSA curves let you choose the message-digest hash:
| Hash | Status |
|---|---|
SHA-256 / SHA-384 / SHA-512 |
recommended |
SHA3-256 / SHA3-384 / SHA3-512 |
recommended |
BLAKE2b-512 |
supported (RSA: PSS only — no PKCS#1 v1.5 DigestInfo OID) |
BLAKE3-256 |
supported (RSA: PSS only — no PKCS#1 v1.5 DigestInfo OID) |
RIPEMD-160 |
legacy |
SHA-1 |
insecure — interop/testing only |
MD5 |
broken — interop/testing only |
EdDSA, Schnorr, and BLS hash the message internally, so the Hash selection does not apply to them.
Pane #1 — SLH-DSA
Post-quantum, hash-based signatures (FIPS 205, formerly SPHINCS+). Choose one of the 12 parameter sets, Generate Keys, then Sign / Validate. Note: SLH-DSA runs in pure JavaScript, so key generation and especially signing can take several seconds — the small-signature (s) and 256-bit sets are the slowest.
Pane #2 — RSA
RSA signatures with a selectable Padding (PKCS#1 v1.5 or PSS) × Hash (any of the above). A Key Size dropdown chooses the RSA modulus — 2048 (default), 3072, 4096, or 1024 (insecure); larger sizes are noticeably slower to generate in pure JS. Keys are shown as PEM. Padding math (EMSA-PKCS1-v1_5 / EMSA-PSS with MGF1) is implemented directly over a chosen digest, which is what enables the non-SHA hashes.
Pane #3 — ECC
Elliptic-curve signatures, selected via the Curve dropdown:
- ECDSA over
P-256,P-384,P-521, andsecp256k1— with any hash. - EdDSA over
Ed25519andEd448. - Schnorr (BIP-340, over secp256k1).
- BLS (BLS12-381).
Keys are shown as raw hex. Signatures are Base64.
Pane #4 — ML-DSA
Post-quantum, lattice-based signatures (FIPS 204, formerly CRYSTALS-Dilithium) — the primary NIST post-quantum signature standard. Choose ML-DSA-44, 65, or 87, Generate Keys, then Sign / Validate. Unlike SLH-DSA, signing is fast.
Pane #5 — BBS
BBS signatures over BLS12-381 — the only pane that does not sign a single value, and the only one whose signature can be turned into something else. It signs an ordered list of messages; the holder can then derive a proof that reveals only the messages they choose, and because each derivation is freshly randomised, two proofs from one signature are unlinkable. That is the property selective disclosure with an SD-JWT cannot offer, where the issuer’s signature is reused verbatim every time.
Everything the draft parameterises is on the pane:
- Ciphersuite —
BLS12-381-SHA-256(the onebbs-2023uses) orBLS12-381-SHAKE-256. They are not two spellings of one scheme: they expand messages differently and each has its own fixedP1point, so a key, a signature and a proof all belong to one suite. Validating across suites fails, as it should. - Input encoding — every octet-string field (messages, header, presentation header, key info, key DST) is read as UTF-8 text or as hex. Choose hex to reproduce the draft’s own test vectors byte for byte.
- Messages — one per line; index 0 is the first line. Order and count are both bound into the signature. A blank line is an empty message; a single trailing newline is just the line ending, so to end the list with an empty message add one more newline.
- Header — an octet string signed over but not a message: it cannot be selectively withheld.
- Key Pair — BBS KeyGen rather than a random scalar: the key is derived from Key Material (≥ 32 bytes of hex — leave it empty and the page generates 32 random bytes and shows them), optional Key Info, and an optional Key DST (empty means the ciphersuite default,
ciphersuite_id || "KEYGEN_DST_"). The same inputs always give the same key, so the pair on screen is reproducible from what is on screen. The private key is a 32-byte scalar and the public key a compressed 96-byte G2 point, both hex. - Sign / Validate Signature — an 80-byte signature (a 48-byte G1 point and a 32-byte scalar), Base64.
- Derived Proof — Disclosed Indexes (comma- or space-separated; empty discloses nothing, which is a legitimate proof) and a Presentation Header, the verifier’s nonce. Derive Proof produces the proof; Verify Proof checks it against the disclosed messages, their indexes, the header and the presentation header. Derive twice and the bytes differ — that is the unlinkability, not a bug.
Symmetric MAC panes
Three panes (badged Symmetric (MAC)) authenticate with a single shared secret. Each has a Value box, a MAC (Base64) box, an algorithm dropdown, a Secret Key (hex) field with Generate Key (which sizes the key to the algorithm; changing the algorithm re-generates it), and Compute MAC / Verify MAC buttons. Verify recomputes the tag over the current value + key and compares it to the MAC box.
- Keyed-Hash MACs — HMAC over SHA-256/384/512, SHA3-256/512, or SHA-1 (insecure); KMAC128/256; and keyed BLAKE2b / BLAKE2s / BLAKE3 (BLAKE3 needs a 32-byte key).
- Block-Cipher MACs — AES-CMAC (RFC 4493); AES-CBC-MAC (legacy — insecure for variable-length messages); AES-GMAC (uses a fixed all-zero nonce here for a deterministic demo tag; real GMAC needs a unique nonce per message).
- Universal-Hash MACs — Poly1305 (RFC 8439; a one-time authenticator — its 32-byte key must be unique per message) and SipHash-2-4. UMAC, VMAC, and PMAC are not offered — no maintained pure-JS implementation exists.
The hand-rolled/derived MACs (CMAC, GMAC, Poly1305, SipHash) are verified against their official test vectors (RFC 4493, Node/OpenSSL, RFC 8439, and the SipHash reference).
Keystore download support
An optional password encrypts the private material: PBES2 for PEM/DER (RSA), a PBES2 JWE for JWK, and native for PKCS#12. Not every key type supports every format — unsupported combinations report a clear status message rather than emit a broken file:
| Pane | PEM | DER | JWK | PKCS#12 |
|---|---|---|---|---|
| RSA | ✓ (encrypted PKCS#8 w/ password) | ✓ | ✓ | ✓ (password required) |
| ECC — ECDSA / EdDSA | ✗ | ✗ | ✓ | ✗ |
| ECC — Schnorr / BLS | ✗ | ✗ | ✗ (copy the hex) | ✗ |
| SLH-DSA / ML-DSA | ✓ (raw, unencrypted) | ✗ | ✓ | ✗ |
| BBS | ✗ | ✗ | ✓ (OKP / Bls12381G2) |
✗ |
Notes & limitations
- Signatures vs MACs — the asymmetric panes are digital signatures (non-repudiation, public verifiability); the symmetric MAC panes use a shared secret and provide neither, so they are not signatures despite living on the same page. They’re grouped and badged separately.
- Pure JS, not Web Crypto — chosen so RSA/ECDSA can use non-SHA hashes. (PBES2 for JWK password protection does use Web Crypto, which is fine — it’s unrelated to the signing hash.)
- Interoperability — standard combinations (RSA/ECDSA with SHA-2/SHA-3, EdDSA, HMAC/KMAC) verify against other tools; exotic ones (RIPEMD-160, BLAKE2b, BLAKE3, keyed-BLAKE MACs, some curve+hash pairings) may not be accepted elsewhere, as they go beyond the JOSE/PKIX registries.
- Not offered (no maintained pure-JS/CJS support): Falcon/FN-DSA, finite-field DSA, Brainpool curves, SM2, GOST (signatures); UMAC, VMAC, PMAC (MACs).
- No persistence — keys, signatures, and MACs live only in the page for the current session.
Certificate Authority & X.509 Tools
The Certificate Authority & X.509 Tools page (/pki.html) builds the PKI the other protocols on this site run on, and then tests it. Reach it from the Tools pane on the OAuth2/OIDC, SAML, WS-Federation and Verifiable Credential pages, or browse directly to /pki.html.
Building a hierarchy
Three CA profiles, in the shape a real deployment uses:
- Root CA — self-signed, long-lived, and the only certificate here that signs itself. Its private key signs the intermediate and then ideally never comes out again.
- Intermediate CA — signed by the root,
pathLenConstraint 1, so exactly one more CA may follow it. - Issuing CA — signed by the intermediate,
pathLenConstraint 0, so it may sign leaves and nothing else. A validator enforces that, and the page lets you prove it by trying.
Then eleven leaf profiles: TLS server, TLS client, both at once, digital signature / non-repudiation, key encipherment, code signing, S/MIME, OCSP responder (with id-pkix-ocsp-nocheck), time stamping, smartcard logon and Kerberos KDC (PKINIT). A profile sets the extensions that kind of certificate normally carries; every one of them is then editable, which is the point — issuing the certificate that is wrong in exactly one way is how you find out what refuses it and what does not.
Every algorithm combination
The signature algorithm (what the issuer signs with) and the subject key algorithm (what is being certified) are chosen independently, and every combination works:
| Signature | RSASSA-PKCS1-v1_5 and RSA-PSS over SHA-256/384/512, ECDSA over SHA-256/384/512, Ed25519 — plus SHA-1 with RSA and ECDSA, marked weak and defaulted to by nothing, because “does my stack still accept a SHA-1 certificate?” is a question a debugger should be able to ask — and the post-quantum ones below |
| Subject key | RSA 2048 / 3072 / 4096, ECDSA P-256 / P-384 / P-521, Ed25519 — and the post-quantum ones below |
The signature list is filtered to what the signing key can actually produce, since an RSA key cannot make an ECDSA signature and offering it produces a browser error that names neither.
Post-quantum, in three ways, and you choose which
The page issues certificates with post-quantum keys and signatures, and it can carry them in three different ways. They are not variations on one idea — they are three answers to “what do I do about a validator that has never heard of ML-DSA” — so the Cryptographic Approach selector is a control rather than a default:
| Approach | What the certificate holds | Who accepts it |
|---|---|---|
| Pure | one post-quantum key, one post-quantum signature, one OID — ML-DSA (RFC 9881), SLH-DSA (RFC 9909), and ML-KEM (RFC 9935) as a subject key | OpenSSL 3.5 and later; anything older refuses it outright |
| Composite | one OID naming an ML-DSA key and a traditional key, with both signatures concatenated inside the single signatureValue (draft-ietf-lamps-pq-composite-sigs-19, sixteen of its eighteen algorithms) |
nothing released yet — a verifier either checks both halves or understands neither |
| Hybrid | an ordinary classical certificate plus a second key and signature in three non-critical extensions (ITU-T X.509 (2019) clause 9.8) | everything, because a validator that does not know the extensions ignores them — which is the whole point |
Thirty-four algorithms in all: ML-DSA-44/65/87, all twelve SLH-DSA parameter sets, ML-KEM-512/768/1024, and sixteen composites. A chain may mix them — an RSA root over an ML-DSA intermediate over an ECDSA leaf is issued and verified here, because that is the shape an organisation actually has during a migration.
Two things about it are worth knowing before you look for them:
- ML-KEM cannot sign. It is a key-encapsulation mechanism, so it is a legitimate subject key — an encryption certificate is exactly a certificate over one — and it can never be self-signed or make the proof of possession a PKCS#10 request is. The page says so rather than offering a menu that cannot work.
- SLH-DSA does not work in TLS, and the refusal is immediate: OpenSSL rejects the certificate before a byte is sent, because there are no TLS signature-algorithm codepoints for it. It is a certificate algorithm, not a handshake one. ML-DSA certificates negotiate perfectly.
Full X.509v3 extension control
basicConstraints, keyUsage (all nine bits), extendedKeyUsage (sixteen named purposes plus any OID), subjectAltName and issuerAltName (DNS, IP v4/v6, email, URI, directory name, registered ID, Microsoft UPN and RFC 4556 Kerberos principal otherNames, and raw otherNames by OID), subjectKeyIdentifier, authorityKeyIdentifier, cRLDistributionPoints, freshestCRL, authorityInfoAccess, subjectInfoAccess, certificatePolicies (with CPS and user-notice qualifiers), policyMappings, policyConstraints, nameConstraints (permitted and excluded subtrees, with the address-plus-mask encoding an IP constraint actually requires), inhibitAnyPolicy, privateKeyUsagePeriod, RFC 7633 TLS Feature (must-staple), id-pkix-ocsp-nocheck, the Netscape certificate type and comment — and any extension at all as an OID, a critical flag and base64 DER.
The critical flag is separately settable on each. A validator must reject a certificate carrying a critical extension it does not understand, so marking the wrong one critical is a good way to find out what your stack really implements.
Keys and certificates are kept
Everything issued is kept in the browser, because a certificate authority is only worth having if it is still there tomorrow — the whole point of a root is that it signs an intermediate next week and an issuing CA the week after. Each object records who issued it, so the page can assemble the chain for an export, a truststore or the TLS test below.
Key pairs come from the same pane, and the same code, as the JWT Tools page, and download in the same formats: PEM, DER, a JWK set, or a password-protected PKCS#12 carrying the key with its whole certificate chain — the format keytool, OpenSSL, Windows and macOS all import. The private key can be encrypted (PBES2) in every format.
Private keys are saved by default and there is a checkbox to stop it, as on every other key-generating page here. It is the private half only: clearing it strips the private keys already written and keeps the certificates and public keys, which are public documents — so the trust anchors and the chains stay usable while nothing can sign any more.
The TLS / mutual-TLS test
The last pane opens a real TLS connection with what you issued and reports the whole handshake: negotiated version and cipher, ALPN protocol, the server’s certificate chain, whether it verified against the truststore you chose, and the TLS alert when it did not. It also reports the post-quantum posture in two halves, because “is this connection post-quantum” is two questions: the key exchange decides whether a recording made today survives a quantum computer, and the certificate decides whether the server can be impersonated by one. A connection with an ML-KEM key exchange and an RSA certificate — the normal state of the world today — is protected against the first and not the second. You can name the key-exchange groups (X25519MLKEM768, which OpenSSL 3.5 offers by default, so naming it proves it was used) and the signature algorithms (mldsa65, to find out whether the far end can authenticate post-quantum at all). You choose the client certificate to present (or none), the trust anchors (yours, the platform’s, both, or nothing at all), the minimum and maximum TLS version, the cipher list, the ALPN protocols and the SNI name — separately from the address dialled, so a certificate for www.example.com can be tested against a staging host.
Ask it to and it will connect twice, with the client certificate and without, and tell you whether the server requires client authentication, does not, or refused the certificate you offered. That has to be measured rather than read: nothing exposes the server’s CertificateRequest, and under TLS 1.3 the handshake completes before the server has said anything about your certificate — its refusal arrives afterwards, as an alert or as a bare hang-up.
This test is made by the API layer, and there is deliberately no option to make it from the browser. A page cannot choose which client certificate to present (the browser picks from its own store, through its own UI), cannot be given a truststore, cannot read the negotiated version, cipher or chain, and receives a failed handshake as a generic network error with the alert — the one informative thing — discarded. So it is one of the few features here that needs the api service running.
SAML Assertion Tool
The SAML Assertion Tool page (/saml_tools.html) is a standalone, browser-only workbench for building a SAML assertion, signing it with XML Signature, and encrypting it with XML Encryption. It emits a spec-compliant assertion for SAML 1.0, SAML 1.1, or SAML 2.0 — the three schemas differ in more than a version number, and the page follows each one.
Reach it from the Tools pane on saml_request.html, or browse directly to /saml_tools.html. The layout mirrors the JWT Tools page: three panes (Compose → Sign → Encrypt), each collapsible, with a Copy button on every multi-line field and a tooltip on every control. Nothing is sent to a server; all crypto runs in the browser on the shared XML security engine (common/xmldsig.js) that also backs the SAML and WS-Trust workflows.
Pane #1 — Compose
- Version — SAML 2.0, 1.1, or 1.0. Switching versions rebuilds the assertion and hides the controls that do not exist in the selected version.
- Issuer — defaults to this debugger’s own URL plus an
/issuerpath (e.g.https://localhost:3000/issuer); override it with any entityID. SAML 2.0 emits a<saml:Issuer>element, SAML 1.x theIssuerattribute. - Identifier and timestamps — the assertion ID (
IDin 2.0,AssertionIDin 1.x) is generated as an NCName, andIssueInstant,NotBefore,NotOnOrAfter,AuthnInstant, and the confirmation/session expiries are populated from the current UTC time. A validity window and clock-skew allowance drive them; Refresh Times and New ID regenerate. Each field stays editable. - NameID — value, Format, NameQualifier, and (2.0 only) SPNameQualifier. Emitted as
<saml:NameID>in 2.0 and<saml:NameIdentifier>in 1.x. - Optional elements — check the ones the assertion should carry:
Subject/SubjectConfirmation(bearer, holder-of-key, sender-vouches, artifact — the URI follows the version),Conditionswith the validity window,AudienceRestriction(AudienceRestrictionConditionin 1.x),OneTimeUse(DoNotCacheConditionin 1.1; absent from 1.0),ProxyRestriction(2.0),Advice, the authentication statement withAuthnContextClassRef(2.0) orAuthenticationMethod(1.x) andSubjectLocality, theAttributeStatement, and the authorization decision statement. - Custom SAML attributes — choose a value type (emitted as
xsi:type), a URI prefix, a name, and a value. In SAML 2.0 the prefix is prepended toNameand switchesNameFormattoattrname-format:uri; in SAML 1.x it becomes the requiredAttributeNamespaceand the name stays inAttributeName. Added attributes are listed in a table and can be removed individually. - SAML Compliance — validates the generated assertion against the selected version’s structural rules (identifier form, UTC instants, required Issuer, statement/Subject requirements, audience and resource URIs, attribute shape, condition ordering, and — once signed — the
<ds:Signature>position), reporting PASS / FAIL / WARN per rule. - Pretty Print / Download / Reset — the Generated Assertion box sits at the top of the pane and updates as you type; there is no rebuild button. Pretty Print re-indents it (and re-signs, if signing is engaged), Download saves the furthest-along artifact (encrypted, else signed, else plain), and Reset restores every field in all three panes to its default, dropping the custom attributes, the generated key pairs, and any signed or encrypted output.
Pane #2 — Sign (XML Signature)
An enveloped XML-DSIG over the whole assertion, with the same options the SAML Test Tools page offers for the AuthnRequest: signature algorithm (RSA-SHA1/256/384/512), canonicalization (exclusive or inclusive C14N 1.0), and RSA key size. Generate Keys produces a throwaway RSA key pair plus a self-signed certificate (downloadable as PEM, inspectable via the certificate details page), which is embedded in the signature’s <ds:KeyInfo>.
Where the signature goes is version-specific, and the page handles it:
| Version | Reference URI | <ds:Signature> position |
|---|---|---|
| SAML 2.0 | #ID |
immediately after <saml:Issuer> |
| SAML 1.1 | #AssertionID |
last child of <saml:Assertion> |
| SAML 1.0 | "" (whole document) |
last child of <saml:Assertion> |
SAML 1.0’s AssertionID is not an xs:ID, so the whole-document reference is the interoperable form there; 1.1 made it an xs:ID. A Validate a Signature box re-checks every reference digest and the SignatureValue — against the certificate in KeyInfo or one you paste — for the assertion just signed or any signed XML you drop in.
Once Sign Assertion has been clicked, signing stays engaged: the Generated Assertion box in pane 1 switches to the signed assertion, and every later change — a different NameID, another attribute, a new signature algorithm, a freshly generated key — rebuilds the assertion and recomputes the signature, so what pane 1 shows is always what the tool would hand over. Reset (or clearing the private key) turns it back off.
Pane #3 — Encrypt (XML Encryption)
Encrypts the signed assertion (sign-then-encrypt) with a random session key that is RSA-wrapped with a recipient certificate — paste the relying party’s certificate or generate a throwaway recipient key pair. The algorithm knobs match the SAML Test Tools encryption pane: encrypted type (Element / Content), canonicalization, data encryption (AES-128/192/256 GCM or CBC, Triple DES CBC), key transport (RSA-OAEP with configurable digest and MGF, RSA-OAEP-MGF1P, RSA-1_5), and — for SAML 2.0 — wrapping the result in <saml:EncryptedAssertion> (SAML 1.x has no such element, so a bare <xenc:EncryptedData> is produced). A Decrypt box round-trips the result back to the signed assertion with the recipient private key. Encryption tracks changes the same way signing does: after the first Encrypt Assertion, any later edit re-runs the whole pipeline — rebuild, re-sign, re-encrypt. The Assertion to Encrypt box follows the current artifact automatically, but stops doing so once you type your own XML into it.
Notes & limitations
- Test keys only — generated key pairs are throwaway. Like the other SAML pages, the page state (including the private keys) is persisted to
localStorageso it survives a reload; do not paste a production key. - Interoperability — the signatures this page produces are verified against the independent
xml-cryptolibrary, and the encryption againstxml-encryption, bytests/xmlsec_interop.js. - Assertion only — the page builds an assertion, not a
<samlp:Response>. To exercise a full SSO round-trip against an IdP, use the SAML Test Tools page.
WS-Trust Test Tools
Drive a WS-Trust 1.4 exchange against a Security Token Service (STS). Chosen from the landing page (the WS-Trust Debugger card), it builds a SOAP RequestSecurityToken (RST) in the browser, sends it to an STS, and shows the RequestSecurityTokenResponse (RSTR) on a dedicated response page. It is modeled on the SAML Test Tools workflow and reuses the same in-browser XML Signature / XML Encryption engine.
Operations
All four WS-Trust operations are supported (via wst:RequestType + the matching wsa:Action):
- Issue — request a new token for a relying party (
wsp:AppliesTo). - Renew — renew an existing token (
wst:RenewTarget). - Validate — validate a token; the response carries
wst:Status/wst:Code(.../status/validor.../status/invalid). - Cancel — cancel a token; the response carries
wst:RequestedTokenCancelled.
Renew, Validate, and Cancel act on an existing token pasted into the Target Token field (e.g. the assertion from a prior Issue).
Protocol versions
A WS-Trust Version selector (1.0 / 1.1 / 1.2 / 1.3 / 1.4) sets the trust namespace used to build the request — http://schemas.xmlsoap.org/ws/2004/04/trust (1.0), http://schemas.xmlsoap.org/ws/2005/02/trust (1.1/1.2), or http://docs.oasis-open.org/ws-sx/ws-trust/200512 (1.3/1.4) — and gates the version-specific options: the Bearer key type appears only for 1.3+ (1.0–1.2 offer SymmetricKey / PublicKey), and ActAs delegation appears only for 1.4. Options that do not apply to the selected version are hidden.
Configuration (wstrust_tools.html)
- STS Endpoint — the STS URL and the SOAP version (1.1 or 1.2).
- WS-Trust Version — the protocol version (see above).
- Request Parameters — operation, requested
wst:TokenType(SAML 2.0, SAML 1.1, JWT, UsernameToken, Status),wst:KeyType(Bearer / SymmetricKey / PublicKey) and key size,wsp:AppliesTo,wst:Lifetime, requestedwst:Claims, and delegation viawst:OnBehalfOf/wst14:ActAs(WS-Trust 1.4). - Credentials / WS-Security — a
wsse:Securityheader with an optionalwsu:Timestampand a credential: awsse:UsernameToken(PasswordText or PasswordDigest) or a SAML token (import the assertion from the SAML workflow, or paste one). - Message Protection — optionally sign the request (a WS-Security enveloped XML digital signature over the SOAP Body and, optionally, the Timestamp; RSA-SHA1/256/384/512) and/or encrypt the request body (W3C XML Encryption) — the same options as the SAML AuthnRequest.
- WS-Addressing —
wsa:Action(auto-derived from the operation),wsa:To,wsa:MessageID,wsa:ReplyTo,wsa:From. - Routing — a radio to originate the STS call from the frontend (browser) or the backend (the API proxy
POST /wstrust), exactly like the OAuth2 token call. A SOAP STS rarely permits cross-origin browser calls (CORS), so backend routing is the reliable path. On the static (backend-less) build the backend option is disabled.
Response (wstrust_response.html)
- Exchange pane — the SOAP request (RST) as pretty-printed XML, the full response (RSTR) as pretty-printed XML, and a Fields tab with the important values (operation, response
wsa:Action, token type, key type, lifetime, AppliesTo, and — for Validate/Cancel — the status / cancelled marker). - Issued Token pane — the security token extracted from
wst:RequestedSecurityToken, as XML and (for a SAML assertion or a JWT) decoded details including the signer certificate. Two in-browser options act on the token: Validate Signature verifies the enveloped XML digital signature on the assertion (reference digests +SignatureValue) using the certificate inKeyInfo; Decrypt decrypts an encrypted token — a<xenc:EncryptedData>/<saml:EncryptedAssertion>in the RSTR (or a message-level EncryptedData) — with the requestor private key. The SAML Response page (saml_response.html) offers the same Validate Signature / Decrypt options for the SAML assertion. Both reuse the shared XML-DSIG / XML-Encryption engine (common/xmldsig.js).
Mock authorization server
The same sts/ service also answers every endpoint its RFC 8414 metadata advertises, so the OAuth2 / OIDC panes have a complete server to talk to without an identity provider:
| Endpoint | What it does |
|---|---|
GET /oauth2/authorize |
A browser flow: an unauthenticated request is answered with a login screen; once the user signs in it redirects back to itself and issues the authorization code (or the implicit / hybrid tokens), echoing state and identifying itself with iss (RFC 9207). Errors go where OAuth 2.0 says — back to the client when redirect_uri is usable, to the user agent when it is not. |
POST /oauth2/login |
The login screen’s target. No password is checked: the username typed in is the identity every issued token then describes (sub, username, preferred_username, given_name, email). login_hint pre-fills the field, Cancel returns access_denied, an empty username re-prompts, and the password invalid is refused. A session cookie means later authorization requests do not prompt again; prompt=login forces a prompt, prompt=none fails with login_required, and GET /oauth2/logout ends the session. |
POST /oauth2/token |
authorization_code (verifying PKCE, single-use codes), refresh_token, client_credentials, password, and RFC 8693 token-exchange. Anything else is an unsupported_grant_type, and the metadata advertises exactly this list. |
POST /oauth2/introspect |
RFC 7662. Reports the real claims of a token it signed; anything forged, expired or revoked is {"active": false}. |
POST /oauth2/revoke |
RFC 7009. Always 200; a revoked token stops introspecting as active and stops refreshing. |
/oauth2/register |
RFC 7591 registration plus RFC 7592 read / update / delete, protected by the registration access token. |
GET /oauth2/jwks |
The signing key, so every token above can be verified. |
/docs, /policy, /tos |
The documents service_documentation, op_policy_uri and op_tos_uri link to. |
Every access, ID and refresh token is a real RS256 JWT signed with the STS key and verifiable against jwks_uri, with the claims OIDC asks for (aud, nonce, at_hash, c_hash). What it does not do is verify anything: no password is checked and any client secret or redirect_uri is accepted. The one credential it refuses is the password invalid, so a negative test has something to fail on.
Because it authenticates interactively, the debugger’s own OAuth2 / OIDC workflow runs against it end to end with no identity provider at all — point the Metadata Retrieval pane at /.well-known/oauth-authorization-server (the default), Populate, and Authorize. The login screen deliberately uses the same field ids as the Keycloak login page (username, password, kc-login), so the Selenium helpers that drive one drive the other unchanged. The suite is tests/oauth2_sts_endpoints.js (no browser).
What the mock records
The service logs with bunyan, at the level its CONFIG_FILE names (sts/env/local.js for the dev and live stacks, sts/env/docker-tests.js for the containerized suite — the same convention the api and client services use). At the default debug level the log is a complete account of what the mock did, which is what makes it useful when a test fails:
- every endpoint call — the path, the request headers and body, the response headers and body, the status code, and how long it took;
- every security artifact both before and after it was protected — a SAML assertion before signing and after, and again before and after encryption; a WS-Trust JWT, an OAuth access/ID/refresh token, an RFC 8414 or OID4VCI
signed_metadatadocument, and an SD-JWT VC (its claims, its disclosures with salts and digests, the issuer-signed JWT, and the final Combined Serialization) — with the signed or encrypted object recorded in full; - entering and leaving every function and every endpoint, on every path.
Set the level to info (sts/env/test.js) for a quiet run.
STS for testing
The workflow is intended to run against Apache CXF’s WS-Trust STS. For the automated test suite it also runs against a small WS-Trust STS mock — rcbj/mock-sts, linked here as the sts/ submodule (see The mock STS is a submodule above) — that speaks the four operations (Issue mints a signed SAML 2.0 assertion or a JWT; Validate/Cancel return the corresponding status), accepts a UsernameToken of wstrust/wstrust, and sends permissive CORS headers. It runs as the sts service (port 8081) in the test/dev compose files, and the WS-Trust tests (tests/wstrust.js, one per operation plus a signed Issue) target it via WSTRUST_STS_URL. That port is HTTPS in every stack here (STS_HTTPS=true), because the RFC 9700 pass is a trust realm on the same instance rather than a second container and a realm binds no socket of its own — see docs/rfc9700.md; the certificate is self-signed and regenerated on every start, and trustStsCertificate() in common/common.sh installs it as an anchor for node and as an exact key pin for Chrome. Against a deployed static site the same mock is started on the host and reached over loopback (https://localhost:8081/sts) so the browser can call it directly from the HTTPS page — a container/bridge hostname would not resolve in a browser off that network. There is no API proxy on that target, so those jobs are routed through the browser (frontend) and the backend-routing job is skipped; setting WSTRUST_STS_URL empty skips the WS-Trust jobs altogether rather than failing them.
VC Issuance (OID4VCI)
Issue a Selective Disclosure JWT Verifiable Credential — SD-JWT, RFC 9901 — from a Credential Issuer using OpenID for Verifiable Credential Issuance (OID4VCI). The workflow plays the wallet’s part across five pages — choose a use case, discover the issuer, authorize and approve, inspect the credential, and refresh it — and deliberately reuses the OIDC Authorization Code flow already implemented on oauth2_oidc_1.html / oauth2_oidc_2.html to authorize the issuance, exactly as OID4VCI intends. It is reached from its own card on the landing page.
Step 0 — Choose a use case (vc-issuance-0.html)
A credential reaches a wallet in more than one way, and OID4VCI’s Appendix H names them. They are not different protocols — they differ in who starts, how the wallet learns what is on offer, and which grant authorizes it — so the choice is made once, here, and the rest of the workflow follows it. Each is a card describing what it is and what it does on the wire; the two that are not implemented yet are listed anyway, plainly marked, because knowing what is coming is more useful than a shorter list.
| Use case | Who starts | On the wire | |
|---|---|---|---|
| H.6 | Wallet-initiated | the wallet | issuer metadata by URL → Authorization Code + PKCE → Credential Request |
| H.1 | Credential Offer, same device | the issuer | Credential Offer (by value or by reference) → issuer_state on the authorization request → Credential Request |
| H.2 | Credential Offer, cross device | the issuer | offer by QR code → pre-authorized code + tx_code → Token Request → Credential Request (no authorization request at all) |
| H.3 | Credential Offer, cross device & deferred | the issuer | the same, and then a 202 Credential Response carrying a transaction_id, collected from the Deferred Credential Endpoint |
Every page of the workflow opens with the same row of links to all five steps (with the current one marked and the finished ones ticked off), so you can move between them directly rather than retracing the flow, and carries a badge saying which use case is running, with a link back here. Changing it discards any Credential Offer in hand but keeps the issuer and client settings already configured.
H.2 and H.3 in this workflow: the issuer displays a QR code on its own screen (the mock’s is at
<credential issuer>/issuer/offer?mode=cross-device, or ?mode=deferred) together with a Transaction Code
that is deliberately not in the offer — it reaches the End-User by another channel, which is what makes a QR
code anyone can photograph safe to display. Because the wallet is on the other device, nothing navigates it
here: step 1’s Receive a Credential Offer pane takes whatever the QR code encodes (an
openid-credential-offer:// URI, an https:// link carrying the same parameters, or the bare JSON).
The offer carries a pre-authorized_code instead of an issuer_state, so there is no authorization request
and nobody is sent to a login page — the End-User was identified by the issuer beforehand. Step 2 grows a
Token Request pane: the assembled call, a field for the Transaction Code, and the token endpoint’s answer.
The wallet refuses to send without the code; the issuer refuses a wrong one; the code is single use.
For H.3 the Credential Response is 202 with a transaction_id and an interval rather than a credential.
A Deferred Issuance pane then shows the assembled Deferred Credential Request, every attempt and what came
back, and the wallet keeps asking at the interval the issuer named until the credential arrives — after which
the transaction_id stops working, as OID4VCI section 9 requires.
H.1 in this workflow: choosing it sends the End-User to the issuer’s web page (the mock issuer’s is at <credential issuer>/issuer) rather than into the wallet. Following the offer link there brings them back to step 1 with a Credential Offer — passed either by value in credential_offer or by reference in credential_offer_uri, both of which the page accepts — which names the issuer, the credential configuration on offer, and the authorization_code grant with its issuer_state. The offer is shown in its own pane, the wallet discovers the issuer and the authorization server it names without being asked, and the issuer_state is carried into the authorization request so the issuer can tie the two halves together. The offer can be discarded, which returns the workflow to wallet-initiated.
Step 1 — Discover the issuer (vc-issuance-1.html)
Four panes, plus a fifth — Credential Offer — shown only when an offer brought the End-User here:
- Credential Issuer Metadata (OID4VCI) — retrieve
/.well-known/openid-credential-issuer, tabulate it (with a note saying which document it is and where it came from), pick one entry ofcredential_configurations_supported, and Validate Signature on the document’ssigned_metadataJWT. The issuer’s keys are resolved the SD-JWT VC way, from/.well-known/jwt-vc-issuerunder the credential issuer identifier (or ajwks_uriin the document itself); the rest of the check is the same code the Metadata Retrieval pane onoauth2_oidc_1.htmlruns — signature,iss, and any signed claim that disagrees with the plain JSON. - Authorization Server Metadata (RFC 8414) — the same pane as
oauth2_oidc_1.html’s. Its URL starts on the deployment’s configured RFC 8414 endpoint (rfc8414MetadataUrlDefault, the mock authorization server the STS service publishes; empty where there is no such service) and is replaced by the server named in the issuer’sauthorization_serversonce the issuer metadata is retrieved. It writes to the samelocalStoragenamesoauth2_oidc_1.htmluses (discovery_info,authorization_endpoint,token_endpoint, the OpenID Provider metadata members, …), so retrieving it here also configures the OAuth2 / OIDC workflow. - Configuration Parameters — every parameter both documents can define, generated from the shared member lists (
client/src/op_metadata.jsfor the OpenID Provider / RFC 8414 members,client/src/vci_metadata.jsfor the credential issuer ones) so the pane cannot drift from them. Each value is overridable; a member the retrieved document omits shows the same grayed-out-->not defined<--note as the debugger pane. The OAuth2 / OpenID Provider half shares its storage with the debugger pages; the OID4VCI half is prefixedvci_. - Authorize Issuance — hands off to
oauth2_oidc_1.html?sdjwtvc=1.
The OIDC leg (oauth2_oidc_1.html → IdP → oauth2_oidc_2.html)
The sdjwtvc=1 query parameter puts the debugger into this workflow: it shows a banner saying so, starts the Authorization Code request with the configuration from step 1, and — once the user has authenticated and oauth2_oidc_2.html has exchanged the code for tokens — sends the browser on to step 2. Without the parameter neither page behaves any differently.
Step 2 — Approve and request (vc-issuance-2.html)
Shows the access / ID / refresh tokens the OIDC leg obtained (and the decoded ID token claims), generates an ES256 holder key pair in the browser (the private half never leaves it), and asks the user to approve the issuance.
The whole request is assembled before the user approves — the page fetches a c_nonce from the issuer’s Nonce Endpoint and signs a proof of possession (typ: openid4vci-proof+jwt, the holder public key in the header, the credential issuer as aud) on load — so the nonce, the proof (raw and decoded), the JSON body, and a box showing the fully assembled call (method, full URL, headers including the Bearer access token, and body) are all there to read first. Approving sends exactly that; because a c_nonce is single use and expires, a proof that has gone stale by then is rebuilt and the request retried once. Deny sends nothing and returns to step 1.
Naming the credential: scope or authorization_details
OID4VCI has two ways for a wallet to say which credential it wants
(§3.3.4 contrasts them), and step 1’s
hand-off pane offers both. A scope is the simple one. authorization_details (RFC 9396)
of type openid_credential is the expressive one, and choosing it changes what happens afterwards: the token
response grants credential_identifiers, and the Credential Request then MUST name one of those and MUST
NOT send a credential_configuration_id. Step 2 says which of the two it is using and why — that is not a
preference, it follows from what was granted — and the mock issuer refuses all three ways of getting it wrong
(both parameters together, the configuration id after identifiers were granted, and an identifier that was never
granted).
Batch issuance and an encrypted Credential Response
Step 2’s Credential Request Options pane offers the two things an issuer’s metadata can advertise and a wallet has to opt into:
- Keys to bind — one proof per key, one credential per proof (§8.3),
capped at the issuer’s
batch_credential_issuance.batch_size. Step 3 then shows every credential that came back, with a picker, and verifies whichever is selected — each is bound to its own key. - Encrypt the response — the wallet generates an RSA key, sends the public half as
credential_response_encryption, and the issuer returns a JWE (application/jwt) instead of JSON, which the page decrypts in the browser. The private half is generated non-extractable, so it cannot leave the page.
Both controls are disabled, with the reason stated, against an issuer whose metadata does not advertise the feature — which is the case for walt.id, and is what the interoperability suite checks.
Telling the issuer what happened
The Credential Response carries a notification_id, and step 3’s Notify the Issuer pane sends the
§11 Notification Request for it:
the assembled call, one of the three events the spec defines (credential_accepted, credential_failure,
credential_deleted), and the issuer’s answer. It is optional for a wallet — an issuer cannot assume it will be
told — so it is a button, not something that happens automatically. The mock issuer validates the id and the
event rather than answering 204 to anything, and records what it was told, so a test can check that the
notification actually landed.
Step 3 — The credential (vc-issuance-3.html)
Takes the returned SD-JWT VC apart the way a verifier would: the Combined Serialization with its ~ separators, the issuer-signed JWT header and payload, and one row per Disclosure — salt, claim name, value, and the digest recomputed in the browser (base64url(SHA-256(the ASCII of the base64url Disclosure))) and looked up in the JWT’s _sd. A checks table reports the media type (dc+sd-jwt), the algorithm, vct, the cnf binding to the holder key from step 2, _sd_alg, the validity window, whether a Key Binding JWT is present (it is not, at issuance), digest coverage, and the issuer signature, verified against the issuer’s published JWKS. The last pane shows the claim set a verifier ends up with if every Disclosure is presented.
Step 4 — Refresh the credential (vc-issuance-4.html)
A credential goes stale: its claim values age and its validity window runs out. Section 14.5, Refreshing Issued Credentials, gives two mechanisms — get an updated credential from the Credential Endpoint with a valid access token, with no End-User interaction at all, or start the issuance over from step 1, which needs the End-User and is the only route left once the refresh token has gone too. This step is the first, in the two calls it is made of:
- Refresh the access token —
grant_type=refresh_tokenat the authorization server’s Token Endpoint (RFC 6749 §6). Nothing about this call is OID4VCI-specific, which is section 14.5’s point; the pane shows it assembled, sends it, and says whether the refresh token rotated — because if it did, the old one is spent. This half is skippable: §14.3 allows asking the Credential Endpoint again with the token already in hand, and the pre-authorized code grant (H.2/H.3) issues no refresh token at all, so the page says so and offers the routes that remain rather than a button that cannot work. - Ask the Credential Endpoint again — the same Credential Request step 2 makes, built by the same module
(
client/src/vci_wallet.js), with a freshc_nonceand a new proof of possession. The wallet chooses whether to stay bound to the holder key the credential already uses (which is what makes the result a replacement) or to bind a new one. An issuer that cannot answer at once may defer this too, so a202with atransaction_idis collected from the Deferred Credential Endpoint — on a button, since nobody is waiting on a refresh.
Then the part that is actually interesting: what changed. Section 14.5 leaves it to the issuer “whether to
update both the signature and the claim values, or only the signature”, and §14.3 permits the same credential
over again, so none of it can be assumed — it is read off the two credentials side by side (vct, iss, sub,
iat/nbf/exp, the bound key, the signature, the Disclosure and digest counts) with a separate comparison of
disclosed claim values. Values, because the salts and therefore every Disclosure and digest are new each time
an issuer mints a credential; reporting those as changes would bury the ones that matter. The verdict names which
case it was.
Credential History. A credential is not one object over its life, so step 4 carries the counterpart of the
Token History pane on oauth2_oidc_2.html — and records more than it does: every attempt, not only the ones
that worked. One row each, newest first, for every access-token refresh, every Credential Request, every poll of
the Deferred Credential Endpoint and every decision you made about what came back, with the outcome
(success, FAILED with the refusal, deferred, returned — not kept yet, kept, discarded) and what the
issuer actually said. Because “I tried to refresh and it did not work” is the case a debugger is most needed for,
and a pane that shows only successes cannot tell you whether the request was refused, deferred, or never made.
Retrying a stale proof leaves both rows; discarding a credential leaves the attempt on record and takes the
credential away. Every row is numbered in # by attempt order; the separate Gen
column carries the generation number, which only the kept rows have, because only those are credentials the
wallet holds and can go back to. The one in hand is marked; every other row says log only. The newest 100
attempts are kept, in a fixed-height scrolling list with a sticky header, so a long log does not push the rest of
the page around. ◀ Older / Newer ▶ (and Oldest / Latest, or Activate on any generation row) move backwards and
forwards through those generations, skipping the log rows, and moving is a real change rather than a highlight: the generation you land on becomes
the credential the wallet holds, together with the holder key pair it is bound to — without that private key
the credential could not be presented at all, so each entry keeps its own. That is what makes going back
useful: a refresh that turned out worse than what it replaced is a real outcome, and this is how you return to
the credential that was working. A refreshed credential you discarded is not in the list, because it was never
held; the Source column distinguishes issued, refreshed (a fresh access token was obtained first) and
refreshed (§14.3) (the token in hand was reused). Clear History forgets the generations and leaves the
credential in hand alone.
A credential the issuer has just returned appears in the pane immediately, marked not kept yet and carrying its own Keep / Discard buttons: the list reacts to the retrieval, not only to the keeping. Keeping it does not navigate anywhere — the new generation simply becomes the one in hand, in the pane you were looking at, and Verify in step 3 is there when you want the full check.
Nothing is replaced until you say so. Section 14.5 again: “the Wallet might need to check if it already has a Credential of the same type and, if necessary, delete the old Credential. Otherwise, the Wallet might end up with more than one Credential of the same type, without knowing which one is the latest.” So Replace promotes the refreshed credential (keeping the old one, and its holder key, for comparison) and opens step 3 to verify it, while Discard leaves the wallet exactly as it was — including its holder key, which a declined refresh must never rotate: the credential still in hand needs the private half to be presented at all.
Interoperability: the same workflow against walt.id
A mock issuer that agrees with us proves only that we agree with ourselves. The
test suite therefore also runs walt.id’s issuer-api2
— an independently written OpenID4VCI 1.0 Credential Issuer — as a container
(waltid/issuer-api2, configured by waltid/config/*.conf), and drives the
same pages, the same bundles and the same buttons against it:
tests/sd_jwt_vc_waltid.js, covering both implemented use cases (H.6 and H.1,
the offer created through walt.id’s own management API exactly as its portal
would create it).
Nothing in the workflow is walt.id-specific. Everything below is a difference in the issuer, and the wallet either copes with it or the test fails:
| What walt.id does | What it means for a wallet |
|---|---|
Its Credential Issuer Identifier has a path (…/openid4vci) |
The metadata is at /.well-known/openid-credential-issuer/openid4vci — RFC 8414 §3.1 inserts the well-known segment before the path; it is not appended. Both forms are tried, insertion first (wellKnownCandidates() in client/src/metadata_client.js), and the provenance note says which one answered. |
It publishes no authorization_servers |
Per OID4VCI §11.2.3 the Credential Issuer is then its own authorization server, and the wallet must fall back to it. |
It signs with a did:jwk |
The credential’s iss is not a URL, so there is no /.well-known/jwt-vc-issuer to fetch — but a did:jwk is the key, base64url-encoded in the identifier, so step 3 resolves it without a network call. Its kid is a DID URL whose fragment is the JWKS key id, which is why key selection falls back from an exact kid match to the fragment and then to trying every published key (a kid is a hint for finding the key, not part of the signature). |
| It authenticates the End-User at an external OpenID Provider | Its authorization endpoint always redirects there. In this suite that provider is the same Keycloak realm everything else uses, so the run is a genuine three-party issuance — our wallet, walt.id as issuer and authorization server, Keycloak as IdP — and the credential ends up carrying the claims of whoever signed in. |
Those four points are exactly the changes the interoperability work produced; the mock issuer never exercised any of them, because it agreed with us by construction.
One thing walt.id does not do is CORS: its services install no CORS plugin at all (walt.id’s own compose
stack fronts every one of them for that reason), and a browser-based wallet cannot read a response without
Access-Control-Allow-Origin. So the container runs behind a small proxy — waltid/cors-proxy.js, no
dependencies, run by a stock node image — that adds those headers and answers preflights itself, and the
issuer’s baseUrl names the proxy: every URL walt.id publishes has to be one the browser can actually use,
and the proof of possession’s aud has to be that same identifier, so the proxy cannot merely forward — it has
to be the issuer’s address. The public demo at issuer2.demo.walt.id shows the same
thing from the other side: its edge sends Access-Control-Allow-Methods: OPTIONS only, so a browser wallet can
read its metadata and never POST to it.
walt.id also publishes no authorization_details_types_supported, notification_endpoint,
batch_credential_issuance or credential_response_encryption. All four are OPTIONAL, so that is not a defect —
but it is the situation a wallet most easily gets wrong, by assuming a feature is there or offering the End-User
something the issuer cannot do. The interoperability suite therefore checks capability detection: every
omitted member is marked -->not defined<--, the batch and encryption controls are disabled with the reason
given, step 3 offers no notification, choosing authorization_details warns that this server does not advertise
it — and the issuance still completes by the route the issuer does support. The mock covers the mechanics of each
feature; only a second implementation can cover behaving correctly when the feature is absent.
Deferred issuance (H.3) is the one use case walt.id cannot exercise: issuer-api2 publishes no
deferred_credential_endpoint and issues everything immediately, which OID4VCI permits — section 9 makes the
endpoint OPTIONAL. The walt.id suite therefore checks that the wallet reads that capability off the metadata
rather than assuming it, and the mock issuer covers the deferred mechanics themselves. That division is what
having both stacks is for: the mock exercises what real deployments leave out.
The issuer’s signing key is generated fresh per run (generateWaltidIssuerKey
in common/common.sh) and passed in through the environment, so no private key
is committed here — the same rule the SAML SP key pair follows. The container is
part of docker-compose-run-tests.yml and local-tests.yml; the job is skipped
when WALTID_ISSUER_URL is unset, so a run without that container still passes.
Mock Credential Issuer for testing
The sts/ service also hosts a bare-minimum OID4VCI Credential Issuer: /.well-known/openid-credential-issuer (with signed_metadata and one dc+sd-jwt credential configuration), /.well-known/jwt-vc-issuer for key resolution, POST /oid4vci/nonce, and POST /oid4vci/credential. It requires a Bearer token, and properly verifies the wallet’s proof of possession (typ, algorithm, audience, single-use nonce, and the signature against the key in the proof’s own header) before minting an SD-JWT VC per RFC 9901 — disclosures with 128-bit salts, _sd digests plus a decoy, _sd_alg, cnf.jwk, and the required trailing ~. It cannot validate an access token issued by a separate authorization server, and does not pretend to. It also implements authorization_details of type openid_credential (advertised as authorization_details_types_supported, granting credential_identifiers in the token response and enforcing the mutual exclusion at the credential endpoint), batch issuance (several proofs, one credential per proof, batch_size enforced — and one c_nonce per request, not per proof), response encryption (RSA-OAEP-256 to the wallet’s key, refusing any algorithm it does not perform), a Notification Endpoint that validates the notification_id and the event and remembers what it was told, the pre-authorized code grant (tx_code required, checked, and single use), and a Deferred Credential Endpoint — 202 with a transaction_id for a few seconds, then the credential, then invalid_transaction_id for anyone who asks again. For H.1 it also hosts the issuer’s side of a Credential Offer: a web page at /issuer with the offer links, GET /issuer/offer which builds the offer and sends the End-User to the wallet (OID4VCI_WALLET_URL) with it — by value or, with ?by=reference, as a credential_offer_uri pointing at GET /oid4vci/credential-offer/:id — and it remembers each issuer_state so the authorization endpoint can recognise a request as belonging to an offer it made. For the cross-device use cases it shows a real QR code and the Transaction Code on its own page (/issuer/offer?mode=cross-device|deferred). By default the metadata advertises the mock itself as its authorization server, which is what lets an issuer-initiated offer be walked end to end with no identity provider at all; OID4VCI_AUTHORIZATION_SERVER points it at a real one instead. The end-to-end test is tests/sd_jwt_vc_issuance.js.
VC Presentation (OID4VP)
Issuance puts a credential in a wallet; presentation is what it is for. This workflow plays the wallet’s part
when a verifier asks for part of a credential over
OpenID for Verifiable Presentations
(OID4VP 1.0), answering with the presentation format
RFC 9901 defines: an SD-JWT+KB. It has its own card on the
landing page, and it presents whatever credential the issuance workflow left in this browser — the two workflows
meet at those localStorage keys and nowhere else.
Step 0 — Choose a flow (vc-presentation-0.html)
The three shapes an OID4VP request can take. All of them start at the verifier, because a presentation is something a verifier asks for:
| Flow | How the request travels | What the wallet can prove about the asker |
|---|---|---|
| Same device, by value | The whole request in the query string | Nothing cryptographic: client_id uses the redirect_uri prefix, so the request cannot be signed. What binds it to the verifier is that the presentation goes to that same URL |
| Same device, signed by reference | client_id + request_uri; the wallet fetches a signed Request Object (RFC 9101) |
That the request really came from a pre-registered client with a known key, and that the claims asked for are the ones it signed |
| Cross device | A QR code (openid4vp://…) on the verifier’s screen |
The same as by value — and nothing can be redirected, which is why direct_post exists |
The page also says whether this wallet is holding a credential and the private half of the key it is bound to, because without both there is nothing to present.
Step 1 — The verifier’s request (vc-presentation-1.html)
Nothing is disclosed here. The page answers three questions: who is asking (the Client Identifier and what its
prefix lets the wallet conclude — with the signature verified when there is one), what they are asking for (the
DCQL query decoded into claim paths, shown in green when the credential can disclose them and red when it
cannot, with the vct checked against the credential in hand), and how the answer travels
(response_type=vp_token, response_mode, response_uri). A request that cannot be answered — no nonce, no
dcql_query, no credential, no holder key — says so instead of letting step 2 discover it. A pane takes a request
pasted from a QR code for the cross-device flow.
Step 2 — Choose what to disclose (vc-presentation-2.html)
The page selective disclosure exists for. One checkbox per Disclosure, marked with whether this verifier asked for it; the default selection is exactly what was asked for and nothing more. Two buttons make the trade-off concrete: Only what was asked for, and Everything (over-disclose) — which is what a credential format without selective disclosure would force on you. From that choice the wallet assembles, in front of you:
- the presentation —
<Issuer-signed JWT>~<selected Disclosures>~<KB-JWT>; - the Key Binding JWT, decoded:
typ: kb+jwt, the request’snonce, the verifier’s Client Identifier asaud,iat, andsd_hash— the digest of the issuer-signed JWT and the presented Disclosures, each followed by a tilde, so it commits to the exact bytes and nothing can be added or removed afterwards; - the
vp_token: a JSON object keyed by the DCQL credential query id, each value an array of presentations; - the claim set the verifier will end up with, computed from those bytes rather than from what the page meant to send;
- the fully assembled
direct_postcall.
Refuse is a first-class answer: OID4VP defines access_denied for it, and the verifier is told the request was
seen and declined — which is not the same as never having arrived.
Step 3 — The verdict (vc-presentation-3.html)
Two accounts of the same event. What the wallet sent, with the presentation’s parts coloured (issuer-signed
JWT · Disclosure · KB-JWT) and re-checked here over the bytes themselves — sd_hash recomputed, every
Disclosure’s digest looked up in _sd, the KB-JWT’s nonce and aud compared with the request. And what the
verifier did: its verdict check by check, what it asked for, what it received, and any over-disclosure —
because a verifier accepts extra claims without complaint, so the wallet is the only party that can care.
Mock Verifier for testing
The sts/ service also hosts a mock OID4VP Verifier: a web page at /oid4vp/verifier, /oid4vp/start which
builds the Authorization Request (by value, signed by reference, or as a QR code), /oid4vp/request/:id serving
the signed Request Object, and POST /oid4vp/response as the Response URI. It verifies properly — the issuer’s
signature, every presented Disclosure’s digest against _sd, the KB-JWT’s typ, alg, nonce, aud, iat and
sd_hash, its signature against the credential’s own cnf.jwk, the validity window, the vct, and whether the
claims it asked for actually arrived — and records a per-check verdict so a failure says which rule was
broken. GET /oid4vp/result/:state (not part of OID4VP; a real verifier shows the End-User its own page) makes
that verdict readable, which is what step 3 and the test suite use.
The suite is tests/sd_jwt_vc_presentation.js, and it is deliberately both halves:
- positive — the whole workflow through the pages, twice (by value and signed by reference), with the
presentation verified independently in the test:
sd_hashrecomputed, the KB-JWT signature checked against thecnfkey, and the verifier’s claim set compared with what it asked for (it must knowgiven_nameandfamily_name, and must not knowemail,birthdate,nationalityoraddress); - negative — five presentations that must be refused, each failing exactly one check: one replayed against a
different request (
KB-JWT nonce), one signed by a key the credential is not bound to (KB-JWT signature), one with a Disclosure the issuer never signed (Disclosure digests), one edited after signing (KB-JWT sd_hash), and one withholding a claim the verifier asked for (Requested claims, driven through the pages). A control case is presented correctly in the same run, so the refusals cannot be an artefact of a verifier that says no to everything.
Interoperability: presentation against walt.id
The mock Verifier above and our wallet were written together, so a run where they agree proves only that they
agree. The same argument that put walt.id’s issuer-api2 in the issuance suite puts
walt.id’s verifier-api2 here — an independently written
OpenID4VP 1.0 verifier with DCQL and its own policy engine — and tests/sd_jwt_vc_presentation_waltid.js drives
the same four pages and the same buttons against it.
The credential it presents is issued by walt.id in the same run, through our own issuance workflow. Neither end
of the exchange is ours, and the credential is walt.id’s in every way that matters to a presentation: signed
ES256 (our mock uses RS256), iss is a did:jwk rather than a URL, and the salts, disclosure layout and
vct are all its choices. The test asserts those properties before presenting anything, because a run that quietly
presented our credential would look identical and prove nothing.
| Step | What happens |
|---|---|
| 1 | walt.id issues a credential through vc-issuance-* (End-User authenticated at Keycloak, since walt.id authenticates nobody itself) |
| 2 | walt.id’s management API creates a verification session: POST /verification-session/create with flow_type, a dcql_query (meta.vct_values read off the credential it just issued, not guessed) and its own vc_policies |
| 3 | Its Authorization Request — both shapes: the full one by value and the short request_uri one — is handed to our step 1, and the workflow runs: choose disclosures, sign the KB-JWT, direct_post the vp_token |
| 4 | walt.id’s session record (GET /verification-session/{id}/info) is read back: its status, its policy_results, and the claims it ended up with — given_name and birthdate present, email and phone_number absent |
There are two negatives, and what they found is worth stating plainly.
The first withholds a claim walt.id asked for. The presentation is otherwise perfect — issuer signature, digests
and Key Binding JWT all valid, and our wallet’s own checks pass — so the only thing wrong is that it does not
answer the question. walt.id accepts it, and reports SUCCESSFUL. That is not a defect in this suite or in our
wallet: verifier-api2 runs a fixed set of policies over a dc+sd-jwt presentation — audience, nonce, sd_hash,
the KB-JWT signature, exp/nbf — and at 0.23.0 none of them asks whether the DCQL query was satisfied. So this
is the mirror of over-disclosure: a verifier that does not check cannot complain, and the wallet is the only party
in a position to say anything. The test asserts what is actually guaranteed — the withheld claim never reached
walt.id — and that our step 3 reports the shortfall in its Answered the request? line.
The second is a replay: the exact bytes walt.id just accepted, posted to a second session. Without it a
SUCCESSFUL verdict would prove nothing, since a verifier that accepted everything would satisfy every other
assertion here. walt.id refuses it — HTTP 400, nonce-check failed, session FAILED with NONCE_MISMATCH —
because the Key Binding JWT is bound to the first session’s nonce. It is posted directly rather than through the
pages, since our wallet will not build a presentation carrying someone else’s nonce, which is the point of it.
Wiring: the verifier container listens on 7004 with its own CORS proxy on 7003 (walt.id sends no CORS headers,
and its urlPrefix must name an address the browser can use), configured from waltid/verifier-config/*.conf
rendered per run by renderWaltidConfig() with a freshly generated request-signing key. It is in both compose
files — docker-compose-run-tests.yml and local-tests.yml — and the job is skipped, not failed, when
WALTID_VERIFIER_URL is unset.
Versioning
Releases are numbered M.N.O:
| Part | Meaning | Source |
|---|---|---|
| M | major | the repo-root VERSION file |
| N | minor | the repo-root VERSION file |
| O | build number | generated per build — the UTC build instant as YYYYMMDDHHMMSS |
So a build of the current 0.9 line looks like 0.9.20260726143205. The build number is a timestamp rather than a counter so that it is unique for every build without any shared state, always increases, and says when the artifact was produced. Set BUILD_NUMBER to override it (for example with a CI run number); if you do, keeping it unique and increasing is up to you.
Each project’s package.json (api, client, tests, sts) also carries the M.N version, as M.N.0 — package.json requires a valid three-part semver, and the real build number lives in VERSION / version.json rather than in the patch slot.
To cut a new minor version, edit VERSION, then run node client/version.js --sync-manifests to bring the four manifests along. node client/version.js --check-manifests reports drift (non-zero exit), and the static build warns about it.
Where it comes from. The build number is fixed when an artifact is built, not when it runs, so every page of a deployment reports the same build and restarting a container does not invent a new one:
- the container image runs
node client/version.js --stamp publicduringdocker build, andserver.jsreads that record once at startup (pass--build-arg BUILD_NUMBER=… --build-arg GIT_COMMIT=…to supply CI values); - the static build (
npm run build) stampsdist/version.jsonat the start of the build.
Tagging. The three build workflows — Docker Image CI, Deploy Static Site (idptools.com), and Deploy Static Site (test.idptools.com) — log the version they are building (in the job log and the run summary), pass its build number into the build so the artifact and the tag agree, and then tag the built commit twice:
| Tag | Example | Behaviour |
|---|---|---|
M.N.O |
0.9.20260726143205 |
created once, never moved — the permanent record of one build |
M.N |
0.9 |
force-moved to the newest build of that line on every build |
The floating M.N tag is the usual moving-tag pattern (as actions/checkout@v4 does), so anyone who has fetched it needs git fetch --tags --force to follow it. Docker Image CI tags only on pushes and manual runs, never on pull requests.
Where it shows. The footer of every page carries v M.N.O; hovering it reveals the build number, the build time, and the commit it was built from. The same record is served as machine-readable JSON at /version.json on both deployment styles:
{ "version": "0.9.20260726143205", "major": "0", "minor": "9",
  "build": "20260726143205", "commit": "228a63c63edd", "builtAt": "2026-07-26T14:32:05Z" }
Version History
- v0.1 - Red Hat SSO support including all OAuth2 Grants and OIDC Authorization Code Flow
- v0.2 - 3Scale + APICast support for all OAuth2 Grants and OIDC Authorization Code Flow
- v0.3 - Azure Active Directory support for OAuth2 Grans and OIDC Authorization Code Flow. Added error reporting logic and support for optional resource parameter. Added additional debug logging code in client. Moved Token Endpoint interaction into server-side (Ruby/Sinatra/Docker); this was necessary because Azure Active Directory does not support CORS (making Javascript interaction from a browser impossible). Disabled IdP server certificate validation in IdP call.
- v0.4 - Full OpenID Connect support (all variations of Implicit and Hybrid Flows). Support for public clients (ie, no client secret).
- v0.5 - Refresh Token support. Updates to UI.
- v0.6 - Rewritten in JavaScript. Ported to AWS for idptools.io website. Numerous enhancements. See Release Notes.
- v0.7 - PKCE Support added.
- v0.8 - Added Selenium-based test suite. Token Endpoint calls can be initiated from frontend or backend. Numerous new features.
- v0.9 - SAML 2.0 and WS-Trust support (SP-initiated SSO, SAML Assertion Tool, WS-Trust 1.0–1.4), JWT / Encoding / Digital Signature tool pages, static-site deployment, and the M.N.O versioning scheme described above.
Authors
Robert C. Broeckelmann Jr. - Initial work
License
This project is licensed under the MIT License - see the LICENSE.md file for details
Acknowledgments
Thanks to the following:
- APICast (3Scale API Management Gateway OAuth2 Example) for being the starting point for this experiment.
- Docker
- docker-compose
- Node.js
- Javascript
- Typescript
- Browserify
- OpenAPI
- Selenium
- Walt.ID
- KeyCloak
- KeyCloak WS-Federation Support
Flows
OAuth2 Client Credentials Grant
- Open https://localhost:3000
- Expand “Metadata Retrieval”, enter the “Metadata Endpoint URL” and click “Retrieve”
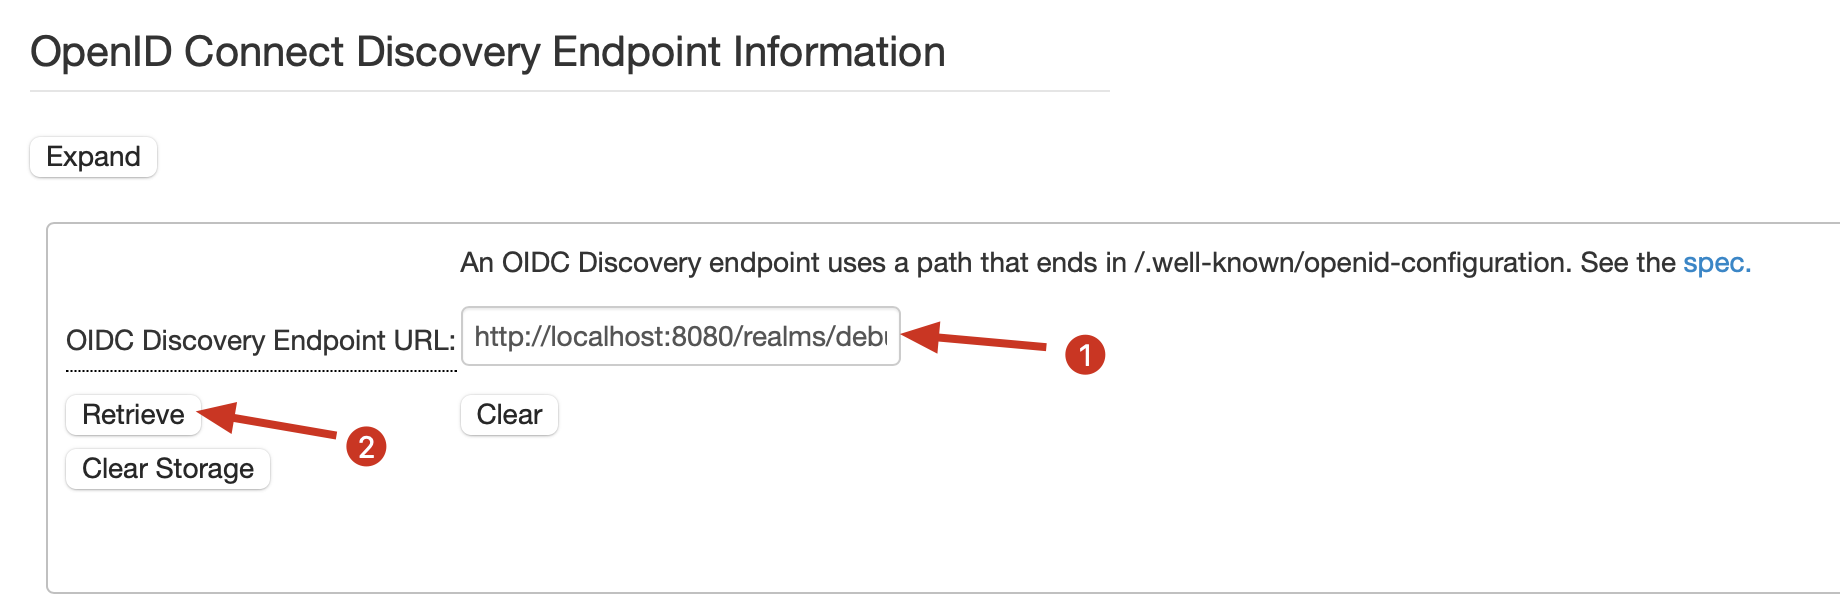
- Scroll down to end of Discovery Endpoint Information table and click “Populate Meta Data”
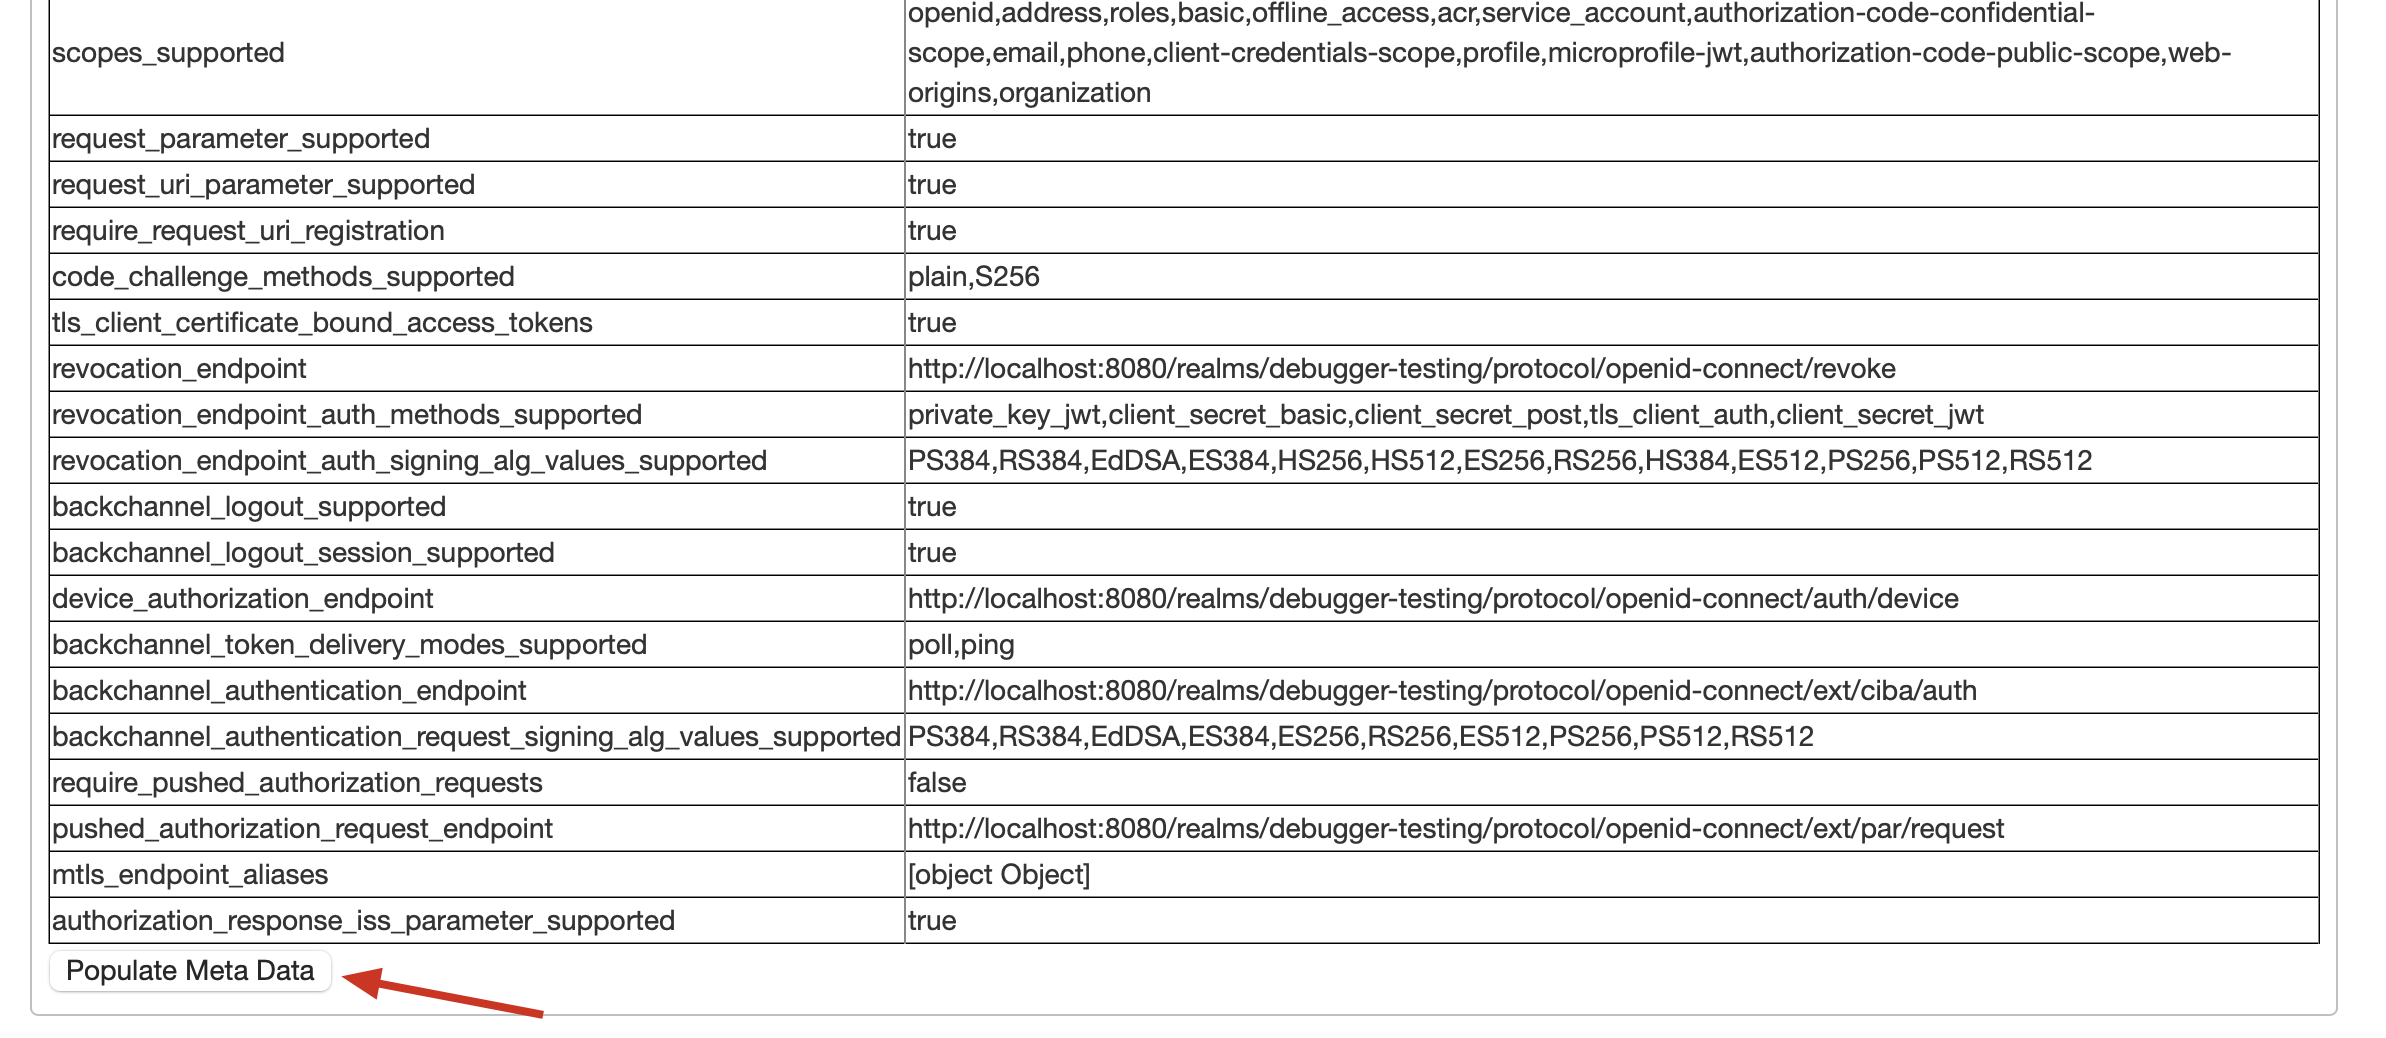
- Expand “Configuration Parameters” and from “Authorization Grant” select “OAuth2 Client Credential”
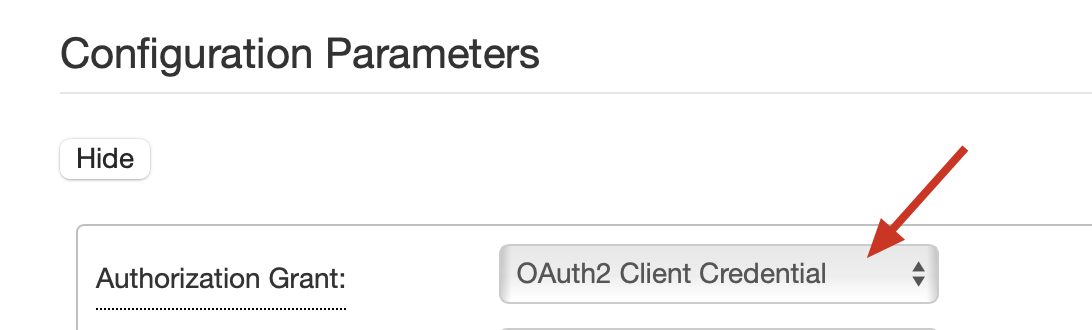
- In “Exchange Authorization Code for Access Token”, enter “Client ID”, “Client Secret” and “Scope”, then click “Get Token”
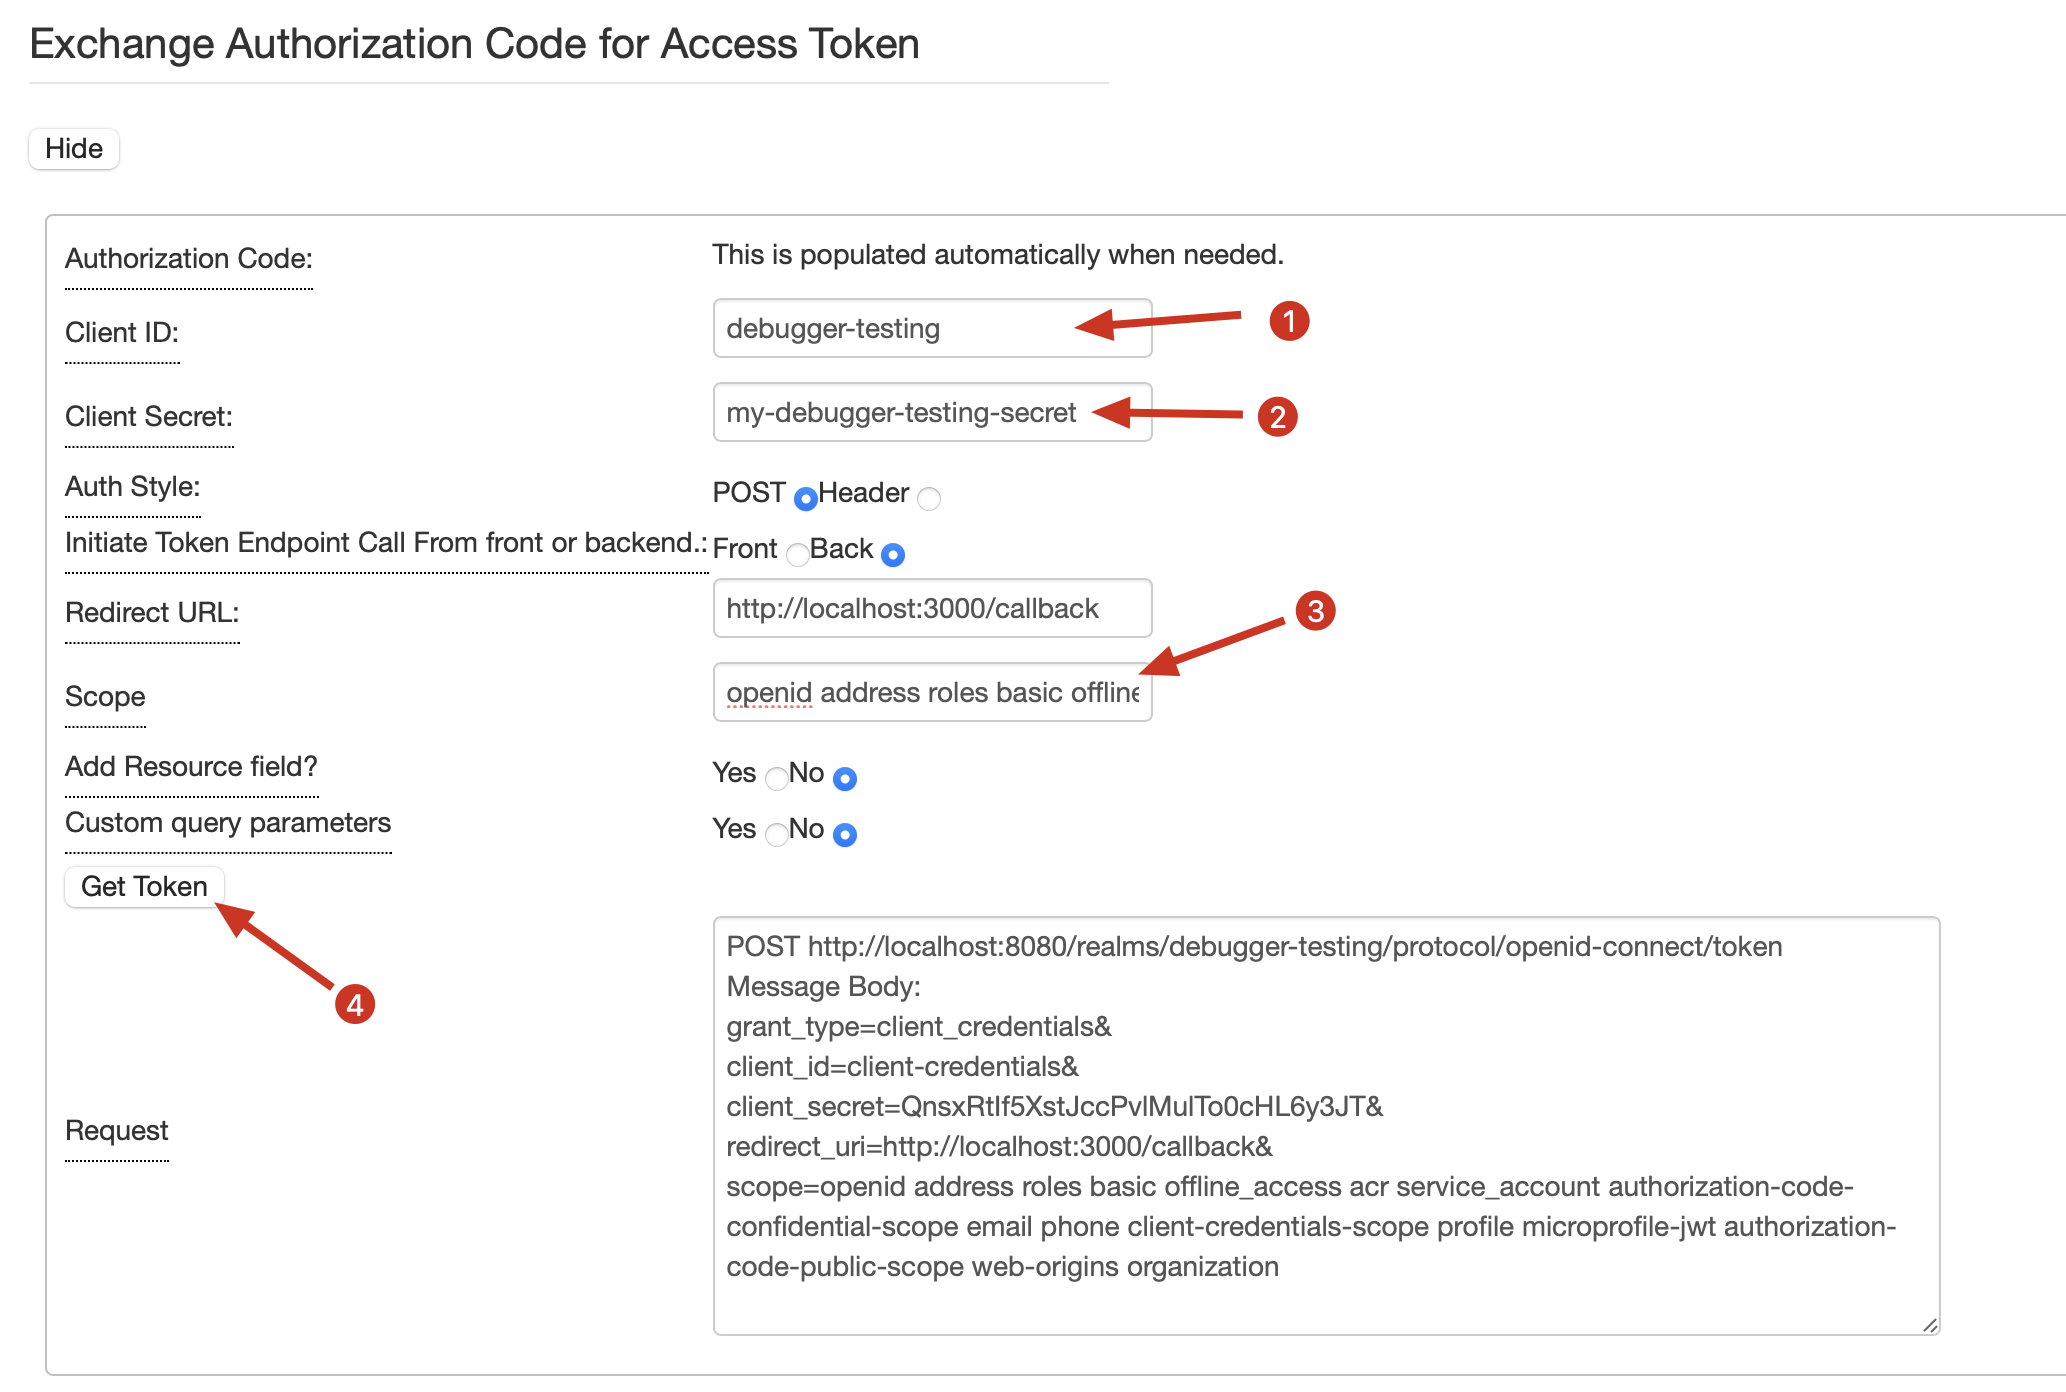
- If successful, the debugger will return “Access token”. You can view additional information for the access token if you click on the “Access token” link
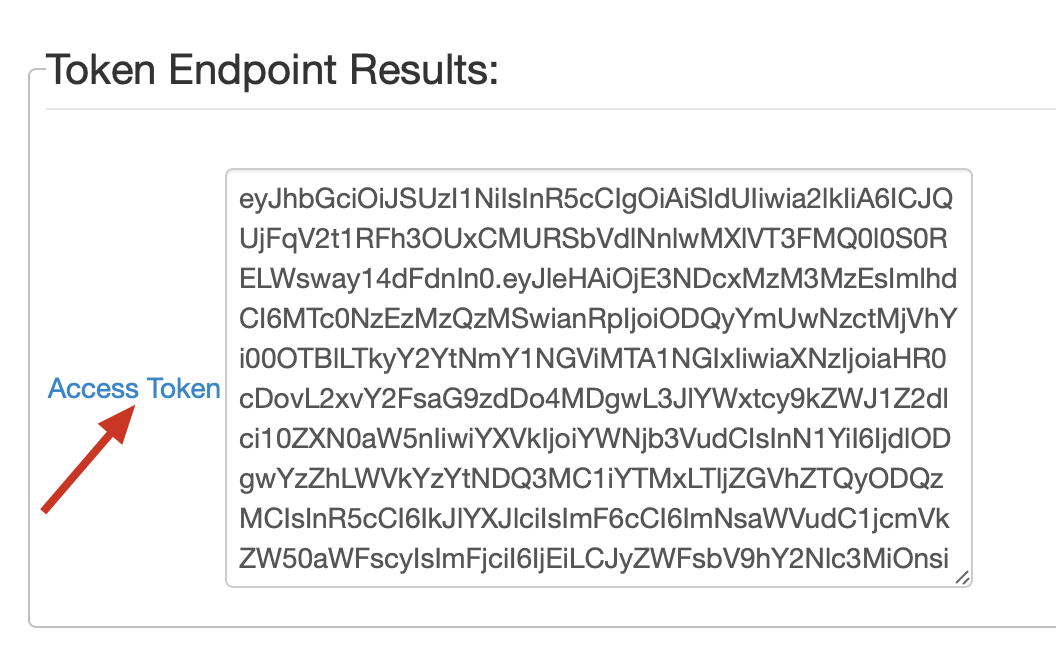
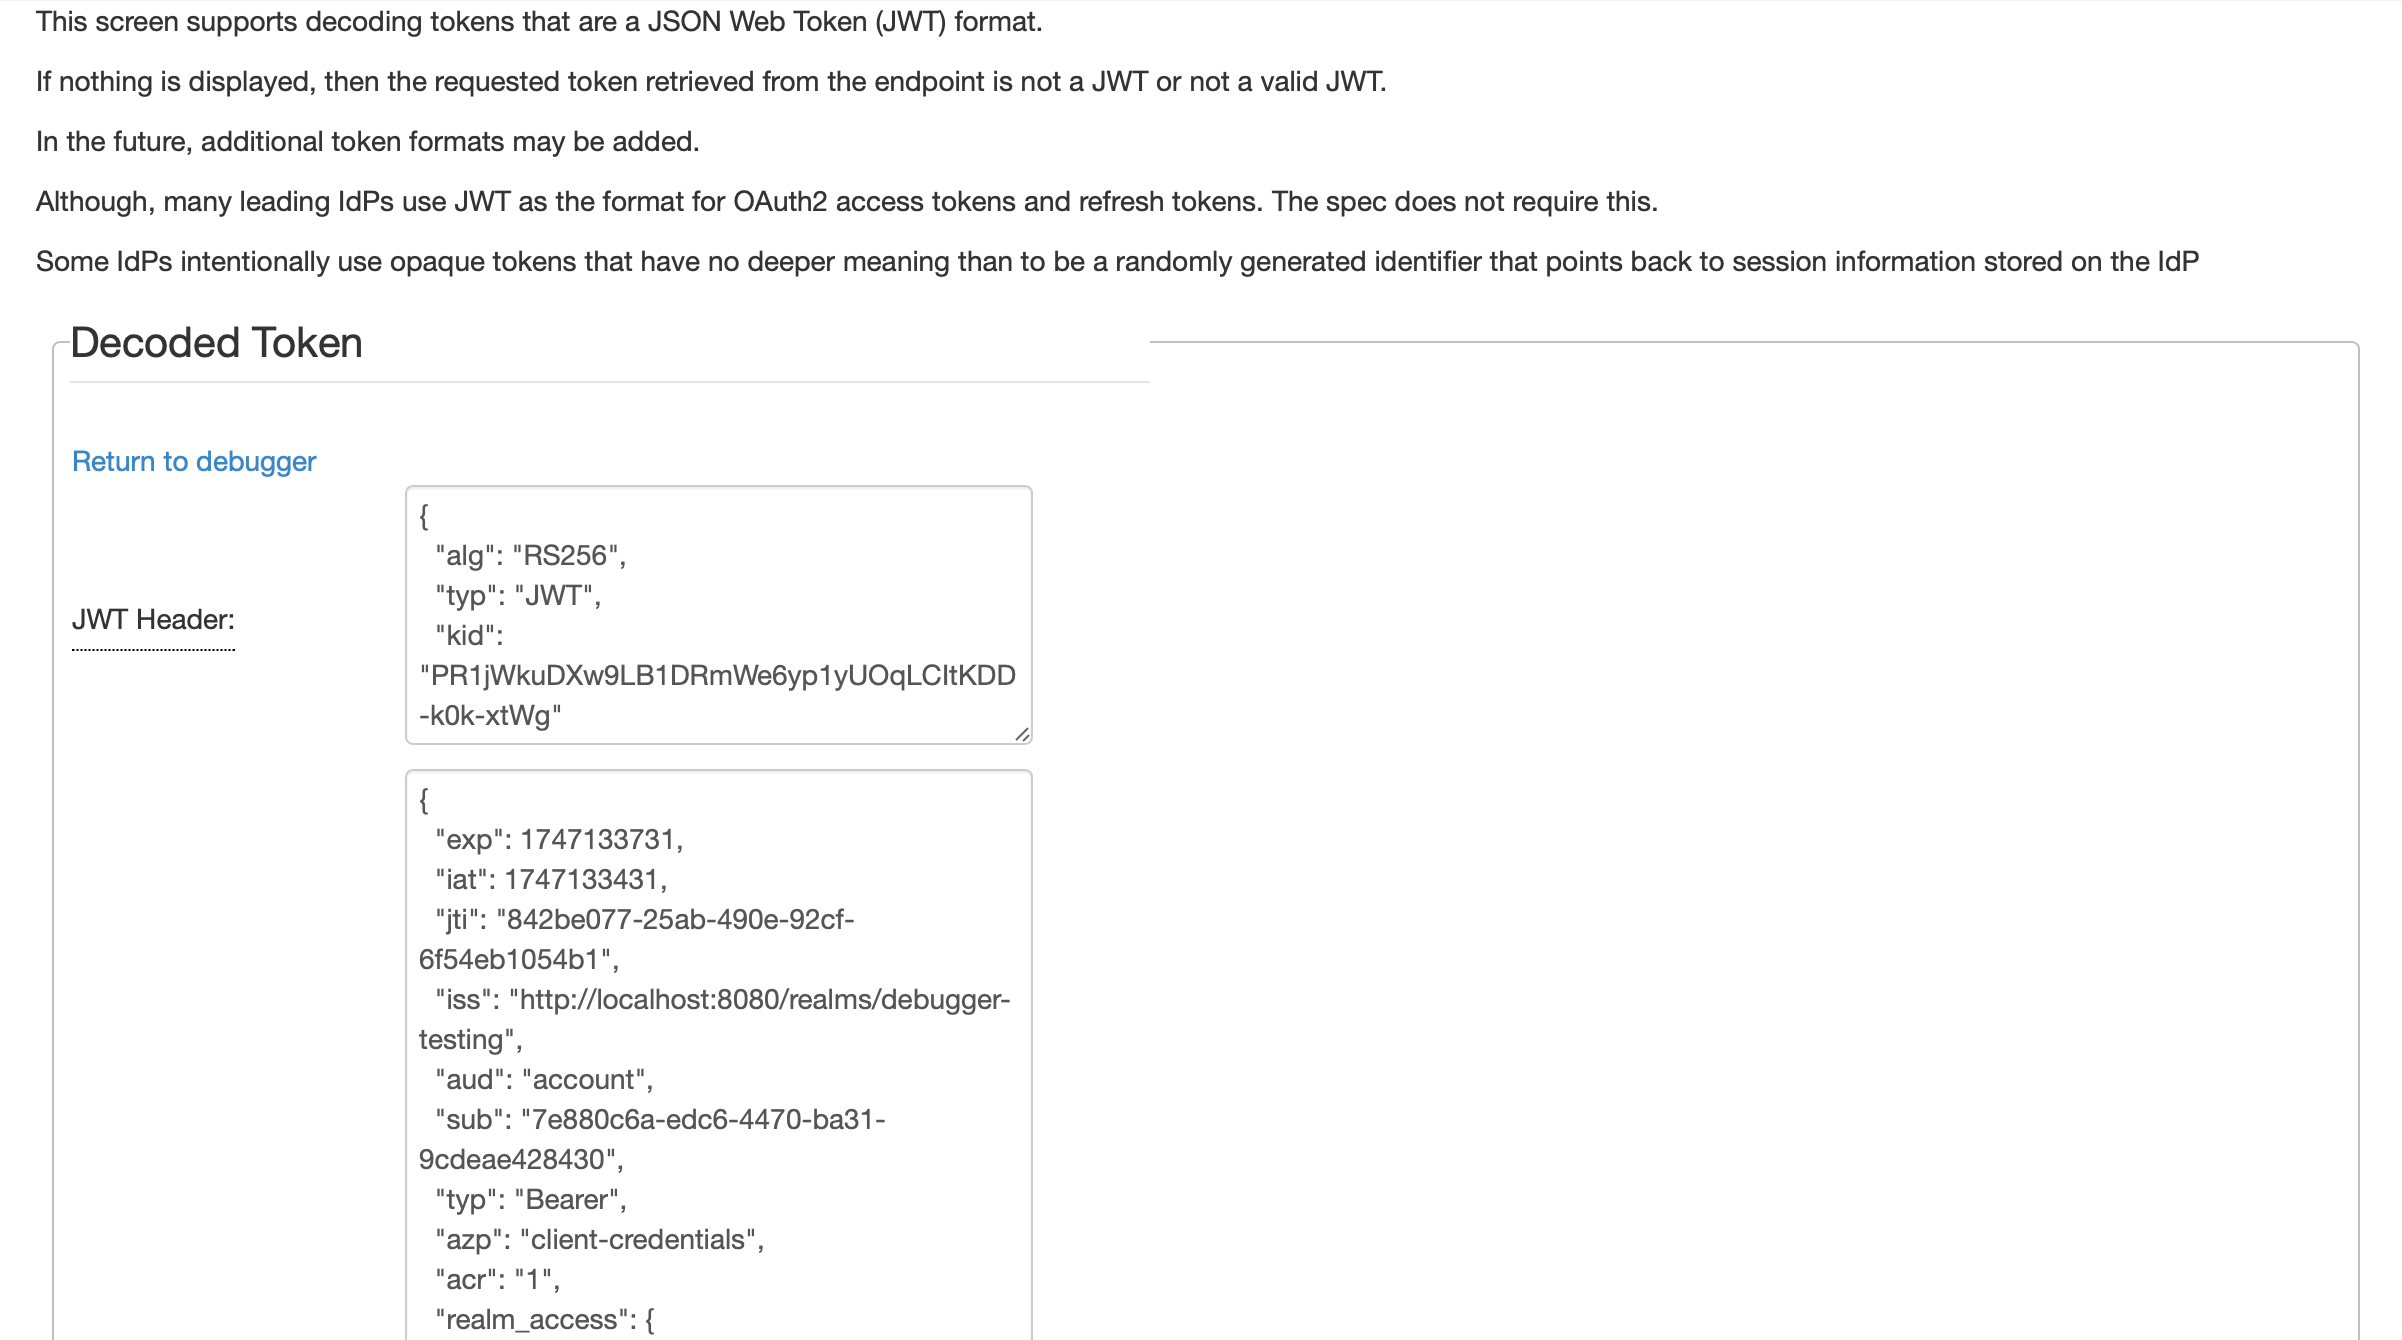
OIDC Authorization Code Flow
- Open https://localhost:3000
- Expand “Metadata Retrieval”, enter the “Metadata Endpoint URL” and click “Retrieve”
- Scroll down to end of Discovery Endpoint Information table and click “Populate Meta Data”
- Expand “Configuration Parameters” and from “Authorization Grant” select “OIDC Authorization Code Flow(code)”
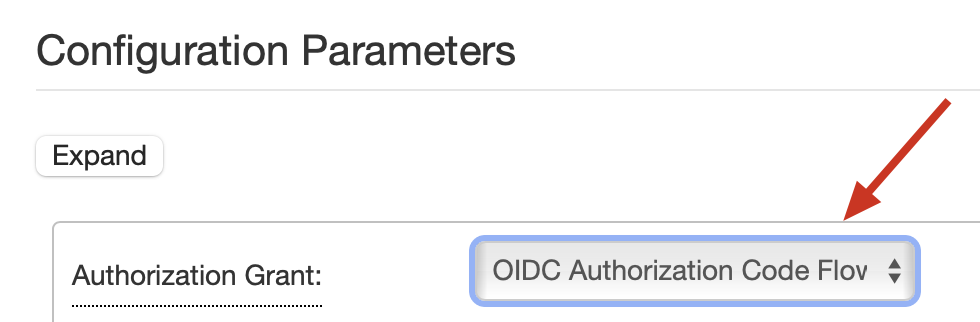
- Optionally, you can modify the following variables:
- Display OIDC Related Artifacts?
- SSL Certificate Validation
- Use Refresh Token
- Use PKCE
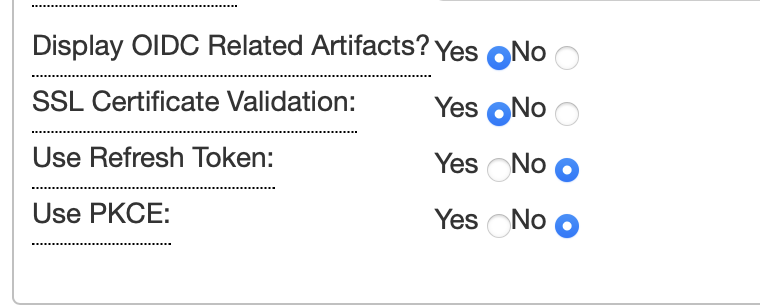
- In “Request Authorization Code”, enter “Client ID” and “Scope”, then click “Authorize”
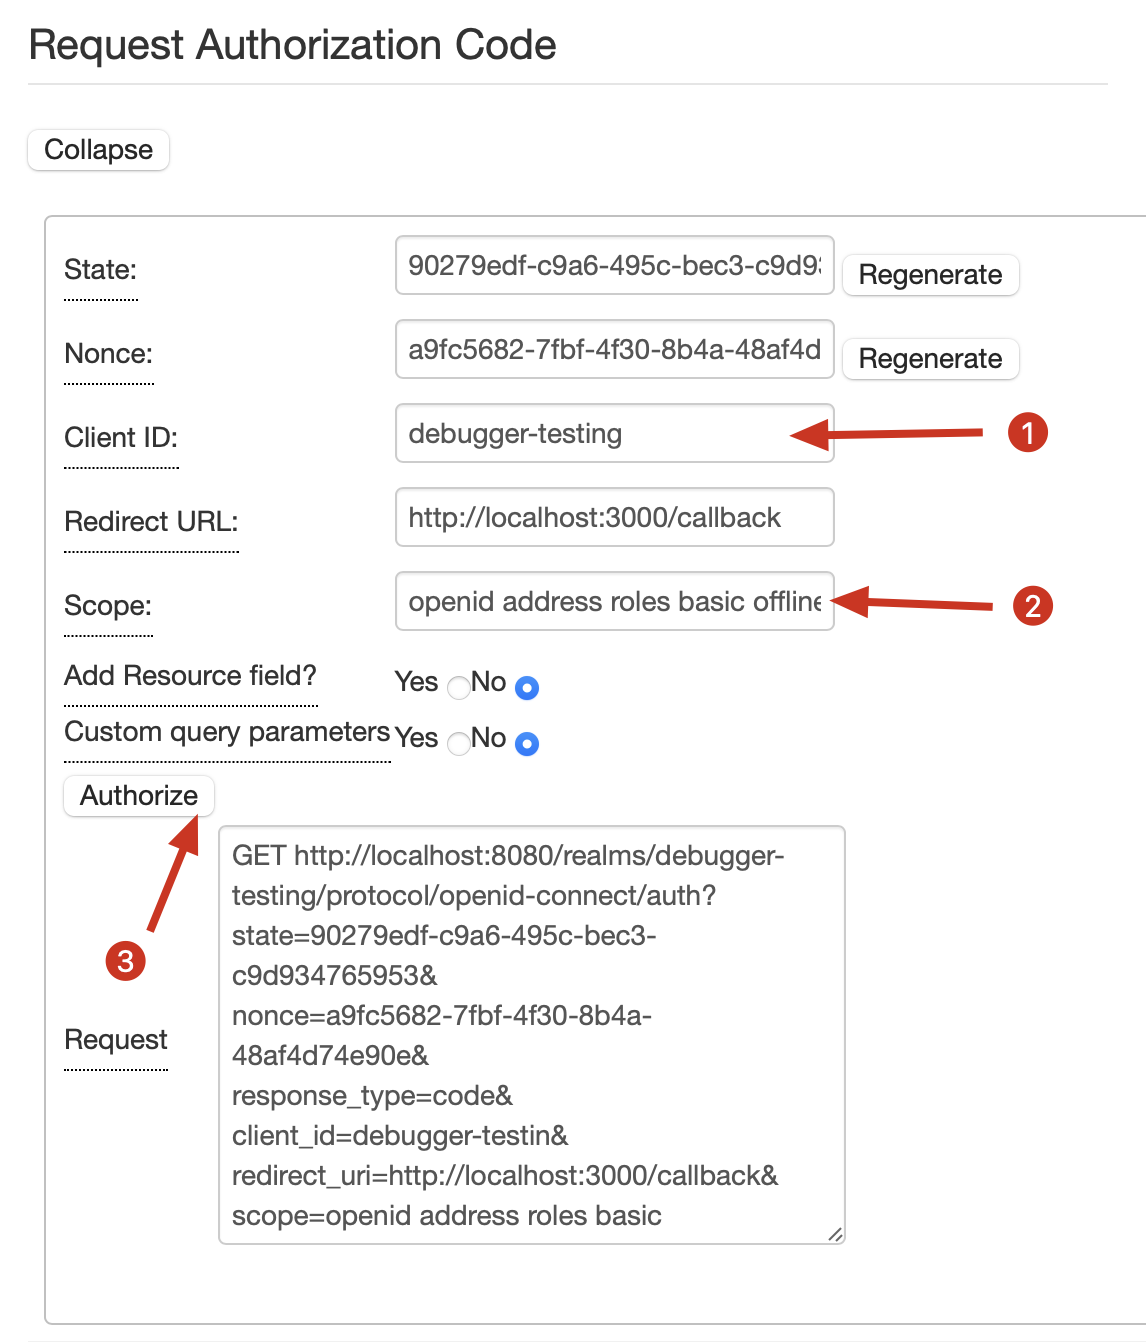
- In the newly opened tab from the identity provider, enter “Username” and “Password”, then click “Sign In”
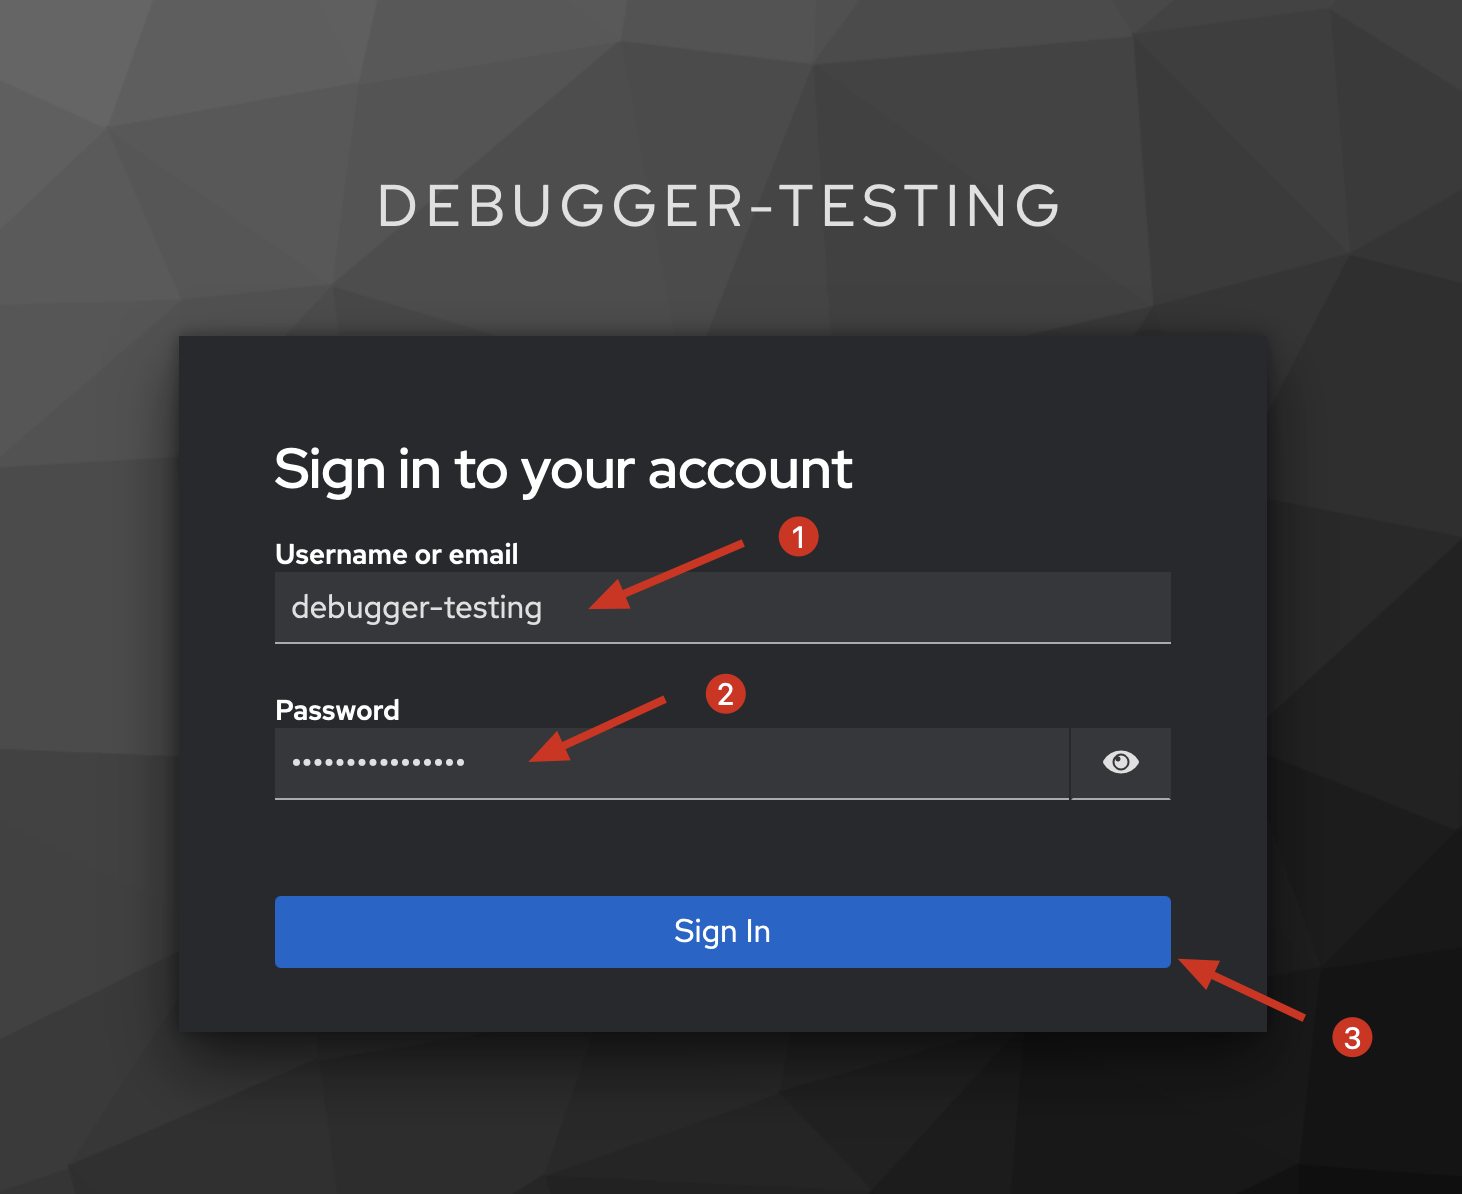
- On successful login, you will be redirected back to the debugger page
- In “Exchange Authorization Code for Access Token”, enter “Client ID”, “Client Secret” (only if client is confidential) and “Scope”, then click “Get Token”
- If successful, the debugger will return “Access token”, “Refresh Token” and optionally “ID Token”. You can view additional information for each of the tokens if you click on their links (1). You can also introspect the access and refresh token using the identity provider introspection endpoint (2). For ID tokens, you can also decode their userinfo data (3)